import java.util.*;

class StreamApiExample {
    public static void main(String[] args) {

        List<Integer> nums = new ArrayList<>(Arrays.asList(1, 2, 3, 4, 5));
        System.out.println(nums);

        List<Integer> arr_nums = nums.stream().map(x -> x * x).toList();
        System.out.println(arr_nums);


        //With Multithreading - this will split and run in parallel cores
        List<Integer> cube_nums = nums.parallelStream().map(x -> x * x * x).toList();
        System.out.println(cube_nums);


        List<Integer> even_nums = nums.stream().filter(x -> x % 2 == 0).toList();
        System.out.println(even_nums);


        int sum_of_nums = nums.stream().reduce((t, x) -> t + x).orElse(0);
        System.out.println(sum_of_nums);

    }
}Author: admin
DSA Tuotiral
Got it! Here’s the updated 8-hour JavaScript DSA training plan with examples without using inbuilt functions like .push(), .pop(), .shift(), .split(), etc.
🚀 8-Hour JavaScript DSA Training Plan (Without Inbuilt Functions)
Hour 1: Introduction to DSA & Complexity Analysis
- Topics:
- What is DSA?
- Time and Space Complexity (Big O Notation)
- Examples:
- Constant Time – O(1)O(1)
function getFirstElement(arr) {
    return arr[0];
}
- Linear Time – O(n)O(n)
function findMax(arr) {
    var max = arr[0];
    for (var i = 1; i < arr.length; i++) {
        if (arr[i] > max) {
            max = arr[i];
        }
    }
    return max;
}
3. Find second highest
nums = [1, 2, 3, 4, 5, 6, 7]

max = -Infinity
second_highest = -Infinity

for(let i = 0; i < nums.length; i++){
    if(nums[i] > max) {
        second_highest = max
        max = nums[i]
    } else if(nums[i] > second_highest && nums[i] !== max)
        second_highest = nums[i]

}

console.log("Maximum: ", max);
console.log("Second Highest: ", second_highest);
4. Sort array using bubble sort
function bubbleSort(arr) {
    let n = arr.length;

    for (let i = 0; i < n - 1; i++) {
        // Last i elements are already sorted, so no need to check them
        for (let j = 0; j < n - i - 1; j++) {
            if (arr[j] > arr[j + 1]) {
                // Swap the elements
                let temp = arr[j];
                arr[j] = arr[j + 1];
                arr[j + 1] = temp;
            }
        }
    }

    return arr;
}

// Example usage
const nums = [5, 2, 9, 1, 5, 6];
console.log(bubbleSort(nums)); // Output: [1, 2, 5, 5, 6, 9]
5. Unique Array – O(n2)
uniq = []
for(let i = 0; i < nums.length; i++) {
    let in_array = true
    for(let j = 0; j < uniq.length; j++) {
        if(nums[i] === uniq[j]) {
            in_array = false
            break
        }
    }

    if(in_array)
        uniq[uniq.length] = nums[i]
}

console.log("Unique Array: ", uniq);
Hour 2: Arrays and Strings
- Topics:
- Manually manipulating arrays and strings
- Examples:
- Reverse an Array
function reverseArray(arr) {
    var reversed = [];
    for (var i = arr.length - 1; i >= 0; i--) {
        reversed[reversed.length] = arr[i];
    }
    return reversed;
}
console.log(reverseArray([1, 2, 3, 4])); // [4, 3, 2, 1]
- Check if a String is a Palindrome
function isPalindrome(str) {
    var reversed = "";
    for (var i = str.length - 1; i >= 0; i--) {
        reversed += str[i];
    }
    return str === reversed;
}
console.log(isPalindrome("madam")); // true
3. String is panagram or not
function isPangram(sentence) {
    // Convert the sentence to lowercase
    sentence = sentence.toLowerCase();

    // Create a set to store unique letters
    const letters = new Set();

    for (let char of sentence) {
        // Check if the character is an alphabet letter
        if (char >= 'a' && char <= 'z') {
            letters.add(char);
        }
    }

    // If the set size is 26, it's a pangram
    return letters.size === 26;
}

// Example Usage
console.log(isPangram("The quick brown fox jumps over the lazy dog")); // true
console.log(isPangram("Hello World"));                                 // false
4. String is anagram or not
function isAnagram(str1, str2) {
    const formatStr = (str) => str.toLowerCase().replace(/[^a-z]/g, '');

    str1 = formatStr(str1);
    str2 = formatStr(str2);

    if (str1.length !== str2.length) return false;

    const charCount = {};

    // Count characters from str1
    for (let char of str1) {
        charCount[char] = (charCount[char] || 0) + 1;
    }

    // Reduce the count based on str2
    for (let char of str2) {
        if (!charCount[char]) return false;
        charCount[char]--;
    }

    return true;
}

// Test cases
console.log(isAnagram("listen", "silent"));         // true
console.log(isAnagram("hello", "world"));           // false
console.log(isAnagram("Triangle", "Integral"));     // true
console.log(isAnagram("Dormitory", "dirty room"));  // true
Hour 3: Linked Lists
- Topics:
- Manually implement Linked List operations
- Examples:
function Node(data) {
    this.data = data;
    this.next = null;
}

function LinkedList() {
    this.head = null;
}

LinkedList.prototype.insert = function (data) {
    var newNode = new Node(data);
    if (!this.head) {
        this.head = newNode;
        return;
    }
    var current = this.head;
    while (current.next !== null) {
        current = current.next;
    }
    current.next = newNode;
};

LinkedList.prototype.display = function () {
    var current = this.head;
    while (current !== null) {
        console.log(current.data);
        current = current.next;
    }
};

var list = new LinkedList();
list.insert(10);
list.insert(20);
list.display();
3.1. Linked List complete example
// Node class to represent each element in the linked list
class Node {
    constructor(value) {
        this.value = value;
        this.next = null;
    }
}

// LinkedList class
class LinkedList {
    constructor() {
        this.head = null;
        this.size = 0;
    }

    // Add element at the end of the list
    append(value) {
        const newNode = new Node(value);

        if (!this.head) {
            this.head = newNode;
        } else {
            let current = this.head;
            while (current.next) {
                current = current.next;
            }
            current.next = newNode;
        }
        this.size++;
    }

    // Add element at the beginning of the list
    prepend(value) {
        const newNode = new Node(value);
        newNode.next = this.head;
        this.head = newNode;
        this.size++;
    }

    // Insert element at a specific position
    insertAt(value, index) {
        if (index < 0 || index > this.size) {
            console.log("Invalid index");
            return;
        }

        if (index === 0) {
            this.prepend(value);
            return;
        }

        const newNode = new Node(value);
        let current = this.head;
        let previous;
        let count = 0;

        while (count < index) {
            previous = current;
            current = current.next;
            count++;
        }

        previous.next = newNode;
        newNode.next = current;
        this.size++;
    }

    // Remove element by value
    remove(value) {
        if (!this.head) return;

        if (this.head.value === value) {
            this.head = this.head.next;
            this.size--;
            return;
        }

        let current = this.head;
        let previous = null;

        while (current && current.value !== value) {
            previous = current;
            current = current.next;
        }

        if (current) {
            previous.next = current.next;
            this.size--;
        } else {
            console.log("Value not found in the list.");
        }
    }

    // Get index of a value
    indexOf(value) {
        let current = this.head;
        let index = 0;

        while (current) {
            if (current.value === value) {
                return index;
            }
            current = current.next;
            index++;
        }
        return -1;
    }

    // Check if the list is empty
    isEmpty() {
        return this.size === 0;
    }

    // Get the size of the list
    getSize() {
        return this.size;
    }

    // Print the list
    print() {
        if (this.isEmpty()) {
            console.log("List is empty");
            return;
        }

        let current = this.head;
        let result = "";
        while (current) {
            result += current.value + " -> ";
            current = current.next;
        }
        console.log(result + "null");
    }

    // Clear the list
    clear() {
        this.head = null;
        this.size = 0;
    }
}

// Example Usage
const list = new LinkedList();

list.append(10);
list.append(20);
list.append(30);
list.print(); // Output: 10 -> 20 -> 30 -> null

list.prepend(5);
list.print(); // Output: 5 -> 10 -> 20 -> 30 -> null

list.insertAt(15, 2);
list.print(); // Output: 5 -> 10 -> 15 -> 20 -> 30 -> null

list.remove(20);
list.print(); // Output: 5 -> 10 -> 15 -> 30 -> null

console.log("Index of 15:", list.indexOf(15)); // Output: 2

console.log("Size of list:", list.getSize()); // Output: 4

list.clear();
list.print(); // Output: List is empty
Hour 4: Stacks and Queues
- Topics:
- Manual stack and queue implementation
- Examples:
- Stack Implementation
function Stack() {
    this.items = [];
    this.top = -1;
}

Stack.prototype.push = function (element) {
    this.top++;
    this.items[this.top] = element;
};

Stack.prototype.pop = function () {
    if (this.top < 0) return null;
    var popped = this.items[this.top];
    this.top--;
    return popped;
};

var stack = new Stack();
stack.push(10);
stack.push(20);
console.log(stack.pop()); // 20
1.1. Complete Stack Example
class Stack {
    constructor() {
        this.items = {};
        this.top = 0; // To keep track of the index
    }

    // Add element to the stack
    push(element) {
        this.items[this.top] = element;
        this.top++;
    }

    // Remove element from the stack
    pop() {
        if (this.isEmpty()) {
            return "Stack is empty";
        }
        this.top--;
        const removedItem = this.items[this.top];
        delete this.items[this.top];
        return removedItem;
    }

    // View the top element of the stack
    peek() {
        if (this.isEmpty()) {
            return "Stack is empty";
        }
        return this.items[this.top - 1];
    }

    // Check if the stack is empty
    isEmpty() {
        return this.top === 0;
    }

    // Get the size of the stack
    size() {
        return this.top;
    }

    // Print all elements in the stack
    print() {
        let result = '';
        for (let i = 0; i < this.top; i++) {
            result += this.items[i] + ' ';
        }
        console.log(result.trim());
    }

    // Clear the stack
    clear() {
        this.items = {};
        this.top = 0;
    }
}

// Example Usage
const stack = new Stack();

stack.push(10);
stack.push(20);
stack.push(30);
stack.print();  // Output: 10 20 30

console.log(stack.peek()); // Output: 30

console.log(stack.pop());  // Output: 30
stack.print();             // Output: 10 20

console.log(stack.isEmpty()); // Output: false

stack.clear();
console.log(stack.isEmpty()); // Output: true
- Queue Implementation
function Queue() {
    this.items = {};
    this.front = 0;
    this.rear = 0;
}

Queue.prototype.enqueue = function (element) {
    this.items[this.rear] = element;
    this.rear++;
};

Queue.prototype.dequeue = function () {
    var item = this.items[this.front];
    delete this.items[this.front];
    this.front++;
    return item;
};

var queue = new Queue();
queue.enqueue(10);
queue.enqueue(20);
console.log(queue.dequeue()); // 10
2.2. Complete Queue Example
class Queue {
    constructor() {
        this.items = {};
        this.front = 0;
        this.rear = 0;
    }

    // Enqueue (add) element to the queue
    enqueue(element) {
        this.items[this.rear] = element;
        this.rear++;
    }

    // Dequeue (remove) element from the queue
    dequeue() {
        if (this.isEmpty()) {
            return "Queue is empty";
        }
        const removedItem = this.items[this.front];
        delete this.items[this.front];
        this.front++;
        return removedItem;
    }

    // View the front element of the queue
    peek() {
        if (this.isEmpty()) {
            return "Queue is empty";
        }
        return this.items[this.front];
    }

    // Check if the queue is empty
    isEmpty() {
        return this.rear === this.front;
    }

    // Get the size of the queue
    size() {
        return this.rear - this.front;
    }

    // Print all elements in the queue
    print() {
        let result = '';
        for (let i = this.front; i < this.rear; i++) {
            result += this.items[i] + ' ';
        }
        console.log(result.trim());
    }

    // Clear the queue
    clear() {
        this.items = {};
        this.front = 0;
        this.rear = 0;
    }
}

// Example Usage
const queue = new Queue();

queue.enqueue(10);
queue.enqueue(20);
queue.enqueue(30);
queue.print();  // Output: 10 20 30

console.log(queue.peek()); // Output: 10

console.log(queue.dequeue()); // Output: 10
queue.print();               // Output: 20 30

console.log(queue.isEmpty()); // Output: false

queue.clear();
console.log(queue.isEmpty()); // Output: true
Hour 5: Recursion
- Examples:
- Factorial Using Recursion
function factorial(n) {
    if (n === 0) return 1;
    return n * factorial(n - 1);
}
console.log(factorial(5)); // 120
- Fibonacci Series
function fibonacci(n) {
    if (n <= 1) return n;
    return fibonacci(n - 1) + fibonacci(n - 2);
}
console.log(fibonacci(6)); // 8
Hour 6: Searching and Sorting
- Examples:
- Binary Search
function binarySearch(arr, target) {
    var left = 0, right = arr.length - 1;
    while (left <= right) {
        var mid = Math.floor((left + right) / 2);
        if (arr[mid] === target) return mid;
        else if (arr[mid] < target) left = mid + 1;
        else right = mid - 1;
    }
    return -1;
}
console.log(binarySearch([1, 2, 3, 4, 5], 3)); // 2
- Bubble Sort
function bubbleSort(arr) {
    for (var i = 0; i < arr.length - 1; i++) {
        for (var j = 0; j < arr.length - 1 - i; j++) {
            if (arr[j] > arr[j + 1]) {
                var temp = arr[j];
                arr[j] = arr[j + 1];
                arr[j + 1] = temp;
            }
        }
    }
    return arr;
}
console.log(bubbleSort([5, 2, 9, 1])); // [1, 2, 5, 9]
Hour 7: Trees and Graphs
- Examples:
- Binary Search Tree (Insert & Traverse)
function TreeNode(val) {
    this.val = val;
    this.left = null;
    this.right = null;
}

function insert(root, val) {
    if (!root) return new TreeNode(val);
    if (val < root.val) root.left = insert(root.left, val);
    else root.right = insert(root.right, val);
    return root;
}

function inOrderTraversal(root) {
    if (root) {
        inOrderTraversal(root.left);
        console.log(root.val);
        inOrderTraversal(root.right);
    }
}

var root = null;
root = insert(root, 10);
root = insert(root, 5);
root = insert(root, 15);
inOrderTraversal(root); // 5 10 15
Hour 8: Hashing and Final Assignment
- Examples:
function HashTable(size) {
    this.table = new Array(size);
}

HashTable.prototype.hash = function (key) {
    var hash = 0;
    for (var i = 0; i < key.length; i++) {
        hash += key.charCodeAt(i);
    }
    return hash % this.table.length;
};

HashTable.prototype.set = function (key, value) {
    var index = this.hash(key);
    this.table[index] = [key, value];
};

HashTable.prototype.get = function (key) {
    var index = this.hash(key);
    if (this.table[index] && this.table[index][0] === key) {
        return this.table[index][1];
    }
    return undefined;
};

var ht = new HashTable(10);
ht.set("name", "John");
console.log(ht.get("name")); // John
Complete Program
// Tuple Example using Class (Simulated Tuple)
class Tuple {
    constructor(...elements) {
        this.elements = elements;
    }
    get(index) {
        return this.elements[index];
    }
    set(index, value) {
        this.elements[index] = value;
    }
}

const tuple = new Tuple(1, 'hello', true);
console.log(tuple.get(0)); // Accessing element

tuple.set(1, 'world'); // Modifying element
console.log(tuple.get(1));

// Map Example using Class
class CustomMap {
    constructor() {
        this.map = new Map();
    }
    add(key, value) {
        this.map.set(key, value);
    }
    get(key) {
        return this.map.get(key);
    }
    delete(key) {
        this.map.delete(key);
    }
    iterate() {
        for (const [key, value] of this.map.entries()) {
            console.log(key, value);
        }
    }
}

const customMap = new CustomMap();
customMap.add('name', 'John');
customMap.add('age', 30);
console.log(customMap.get('name'));
customMap.delete('name');
customMap.iterate();

// Linear Search using Function
function linearSearch(arr, target) {
    for (let i = 0; i < arr.length; i++) {
        if (arr[i] === target) return i;
    }
    return -1;
}

// Binary Search using Function
function binarySearch(arr, target) {
    let left = 0, right = arr.length - 1;
    while (left <= right) {
        const mid = Math.floor((left + right) / 2);
        if (arr[mid] === target) return mid;
        else if (arr[mid] < target) left = mid + 1;
        else right = mid - 1;
    }
    return -1;
}

// KMP String Search using Function
function KMPSearch(pattern, text) {
    const lps = computeLPSArray(pattern);
    let i = 0, j = 0;
    while (i < text.length) {
        if (pattern[j] === text[i]) {
            i++; j++;
        }
        if (j === pattern.length) {
            console.log('Pattern found at index', i - j);
            j = lps[j - 1];
        } else if (i < text.length && pattern[j] !== text[i]) {
            j !== 0 ? j = lps[j - 1] : i++;
        }
    }
}

function computeLPSArray(pattern) {
    const lps = [0];
    let len = 0, i = 1;
    while (i < pattern.length) {
        if (pattern[i] === pattern[len]) {
            len++;
            lps[i] = len;
            i++;
        } else if (len !== 0) {
            len = lps[len - 1];
        } else {
            lps[i] = 0;
            i++;
        }
    }
    return lps;
}

// Tree Node and Traversal using Class
class TreeNode {
    constructor(value) {
        this.value = value;
        this.left = null;
        this.right = null;
    }
}

class TreeTraversal {
    static dfs(node) {
        if (!node) return;
        console.log(node.value);
        this.dfs(node.left);
        this.dfs(node.right);
    }

    static bfs(root) {
        const queue = [root];
        while (queue.length > 0) {
            const node = queue.shift();
            console.log(node.value);
            if (node.left) queue.push(node.left);
            if (node.right) queue.push(node.right);
        }
    }
}

// Bubble Sort using Function
function bubbleSort(arr) {
    const n = arr.length;
    for (let i = 0; i < n - 1; i++) {
        for (let j = 0; j < n - i - 1; j++) {
            if (arr[j] > arr[j + 1]) {
                [arr[j], arr[j + 1]] = [arr[j + 1], arr[j]];
            }
        }
    }
    return arr;
}

const sampleArray = [5, 3, 8, 4, 2];
console.log(bubbleSort(sampleArray));
DSA Assesment
Sure! Here are three easy-level DSA problems using Array, Linked List, and Map, along with their solutions in JavaScript.
1. Array Problem (Easy)
Problem: Find the Second Largest Element
Given an array of integers, find the second largest element in the array.
If there is no second largest element, return -1.
Example:
Input: arr = [10, 5, 20, 8]
Output: 10

Input: arr = [7, 7, 7]
Output: -1
Solution (JavaScript)
function secondLargest(arr) {
    if (arr.length < 2) return -1;

    let largest = -Infinity, secondLargest = -Infinity;

    for (let num of arr) {
        if (num > largest) {
            secondLargest = largest;
            largest = num;
        } else if (num > secondLargest && num < largest) {
            secondLargest = num;
        }
    }

    return secondLargest === -Infinity ? -1 : secondLargest;
}

// Test Cases
console.log(secondLargest([10, 5, 20, 8])); // Output: 10
console.log(secondLargest([7, 7, 7])); // Output: -1
console.log(secondLargest([3])); // Output: -1
Time Complexity: O(n)O(n)
2. Linked List Problem (Easy)
Problem: Find the Middle Node of a Linked List
Given a singly linked list, return the middle node.
If there are two middle nodes, return the second one.
Example:
Input: 1 → 2 → 3 → 4 → 5
Output: 3

Input: 1 → 2 → 3 → 4 → 5 → 6
Output: 4
Solution (JavaScript)
class ListNode {
    constructor(val) {
        this.val = val;
        this.next = null;
    }
}

function findMiddle(head) {
    let slow = head, fast = head;

    while (fast !== null && fast.next !== null) {
        slow = slow.next;  // Move slow one step
        fast = fast.next.next;  // Move fast two steps
    }

    return slow.val;
}

// Helper function to create a linked list
function createLinkedList(arr) {
    let head = new ListNode(arr[0]);
    let current = head;
    for (let i = 1; i < arr.length; i++) {
        current.next = new ListNode(arr[i]);
        current = current.next;
    }
    return head;
}

// Test Cases
let head1 = createLinkedList([1, 2, 3, 4, 5]);
console.log(findMiddle(head1)); // Output: 3

let head2 = createLinkedList([1, 2, 3, 4, 5, 6]);
console.log(findMiddle(head2)); // Output: 4
Time Complexity: O(n)O(n)
3. Map Problem (Easy)
Problem: Find First Non-Repeating Character
Given a string s, find the first non-repeating character and return its index.
If all characters repeat, return -1.
Example:
Input: "leetcode"
Output: 0  // ('l' is the first unique character)

Input: "aabb"
Output: -1  // (No unique character)
Solution (JavaScript)
function firstUniqueChar(s) {
    let charCount = new Map();

    // Count frequency of characters
    for (let char of s) {
        charCount.set(char, (charCount.get(char) || 0) + 1);
    }

    // Find the first unique character
    for (let i = 0; i < s.length; i++) {
        if (charCount.get(s[i]) === 1) return i;
    }

    return -1;
}

// Test Cases
console.log(firstUniqueChar("leetcode")); // Output: 0
console.log(firstUniqueChar("loveleetcode")); // Output: 2
console.log(firstUniqueChar("aabb")); // Output: -1
Time Complexity: O(n)O(n)
These problems are great for understanding Array, Linked List, and Map usage in JavaScript. Let me know if you need more! 🚀
How to clear RAM – Clear Cache – Drop Cache
The “1, 2, 3” cache clear method in Linux refers to clearing different types of caches managed by the operating system. Each cache type is managed differently and cleared by writing a specific value to the file /proc/sys/vm/drop_caches.
Cache Types:
- PageCache (Value:
1):- PageCache stores file contents that are cached in memory to reduce disk I/O.
- Dentries and Inodes (Value:
2):- Dentry is a cache of directory entries, and inodes store file metadata.
- PageCache + Dentries + Inodes (Value:
3):- Clears both PageCache and Dentry/inode caches.
Steps to Clear Cache with Examples:
1. Check Current Memory Usage
Use the free -h command to view current memory and cached memory:
free -h
Look under the “buff/cache” column to see the cache usage.
2. Clear Cache
Use the following commands to clear caches. Root privileges are required, so prefix with sudo:
Clear PageCache:
sudo sh -c "echo 1 > /proc/sys/vm/drop_caches"
Clear Dentry and Inode Cache:
sudo sh -c "echo 2 > /proc/sys/vm/drop_caches"
Clear Both PageCache and Dentry/Inode Cache:
sudo sh -c "echo 3 > /proc/sys/vm/drop_caches"
3. Check Memory Usage Again
Run the free -h command again to verify that the cache has been cleared.
Example Workflow:
- Check Memory Before Clearing:
free -hOutput:total used free shared buff/cache available Mem: 15Gi 4.0Gi 2.0Gi 0.5Gi 9Gi 10Gi Swap: 2Gi 0B 2Gi - Clear All Caches (PageCache, Dentries, and Inodes):
sudo sh -c "echo 3 > /proc/sys/vm/drop_caches" - Check Memory After Clearing:
free -hOutput:total used free shared buff/cache available Mem: 15Gi 4.0Gi 7.0Gi 0.5Gi 4Gi 11Gi Swap: 2Gi 0B 2Gi
Notice how the “buff/cache” column decreases.
Best Practices
- Clearing caches isn’t typically necessary because Linux uses unused memory to cache files and automatically clears it when needed.
- Use this method only for debugging or specific needs (e.g., testing performance under no cache conditions).
Would you like to try this on your system now? Let me know if you need additional help!
Let’s break down PageCache, Dentries, and Inodes with simple explanations and commands you can use on your Ubuntu system to see how they work.
1. PageCache
- What it is:
- PageCache stores file data read from disk in memory to speed up future reads.
- If a file is accessed again, the system reads it from memory instead of the slower disk.
- Example:
- Create a Large File:
dd if=/dev/zero of=testfile bs=1M count=100This creates a filetestfileof 100 MB size. - Clear Cache:
sudo sh -c "echo 3 > /proc/sys/vm/drop_caches" - Read the File (Populates PageCache):
time cat testfile > /dev/nullThe first read is slow because it loads data from disk. - Read the File Again (From PageCache):
time cat testfile > /dev/nullThe second read is faster as it fetches data from memory (PageCache). - Verify Cache Usage: Check memory usage using:
free -h
- Create a Large File:
2. Dentries
- What it is:
- A dentry (directory entry) cache stores metadata about directories, such as filenames and their locations in the filesystem.
- This speeds up directory traversals and file lookups.
- Example:
- Clear Cache:
sudo sh -c "echo 3 > /proc/sys/vm/drop_caches" - List a Large Directory (Populates Dentry Cache):
ls -R /usr > /dev/null - List the Directory Again (From Dentry Cache):
time ls -R /usr > /dev/nullThe second run will be faster because the directory structure is cached in memory.
- Clear Cache:
3. Inodes
- What it is:
- An inode is a data structure storing metadata about a file (e.g., permissions, owner, size).
- Inode caching stores this metadata to reduce disk reads.
- Example:
- Find Inodes Used by the System:
df -iThis shows the inode usage for each mounted filesystem. - Create Many Files (Populates Inode Cache):
mkdir testdir for i in {1..10000}; do touch testdir/file$i; done - Clear Cache:
sudo sh -c "echo 2 > /proc/sys/vm/drop_caches" - List Files (Rebuilds Inode Cache):
time ls testdir > /dev/null - List Files Again (From Inode Cache):
time ls testdir > /dev/nullThe second run will be faster due to inode caching.
- Find Inodes Used by the System:
Summary of Commands:
free -h: Check memory usage (PageCache in “buff/cache”).df -i: Check inode usage for filesystems.echo [1|2|3] > /proc/sys/vm/drop_caches: Clear caches.
The command dd if=/dev/zero of=testfile bs=1M count=100 is a Linux command used to create a file filled with zeros. Here’s a breakdown of each part:
Command Breakdown:
dd:- A low-level command-line utility used for copying and converting data between files or devices.
if=/dev/zero:ifstands for “input file.”/dev/zerois a special file in Linux that produces a continuous stream of null bytes (zeros).
of=testfile:ofstands for “output file.”testfileis the name of the file where the data (zeros) will be written.
bs=1M:bsstands for “block size.”- This sets the size of each block of data to 1 Megabyte (MB).
count=100:- Specifies the number of blocks to copy.
- In this case, 100 blocks of 1 MB each.
What the Command Does:
- It writes 100 MB (1 MB × 100 blocks) of zero-filled data to a file named
testfile.
Example Output:
When you run the command, you’ll see something like this:
100+0 records in
100+0 records out
104857600 bytes (105 MB) copied, 0.123456 s, 847 MB/s
This means:
100+0 records in: 100 blocks read from the input file (/dev/zero).100+0 records out: 100 blocks written to the output file (testfile).104857600 bytes: Total bytes written (100 MB).0.123456 s: Time taken to execute the command.847 MB/s: Write speed.
Verify the File:
- Check the file size:
ls -lh testfileYou should see the size as100 MB. - Inspect the file contents:
hexdump -C testfile | headThis will display the file’s contents in hexadecimal format, and you’ll see it filled with00(zeros).
Why clearing dentries does not affect memory a lot
The behavior you’re observing can be explained by how Linux handles PageCache and Dentries/Inodes caching.
Key Points:
- PageCache (Cleared with
echo 1 > /proc/sys/vm/drop_caches):- Clearing PageCache removes cached file data but does not clear dentries and inodes.
- If you only clear the PageCache, Linux has to read file contents from disk, but dentry and inode information might still be available in memory.
- Dentries and Inodes (Cleared with
echo 2 > /proc/sys/vm/drop_caches):- Clearing dentry and inode caches removes directory structure and file metadata information from memory.
- If dentry and inode caches are cleared, listing directories or performing file operations becomes slower because the system must rebuild this information by reading from disk.
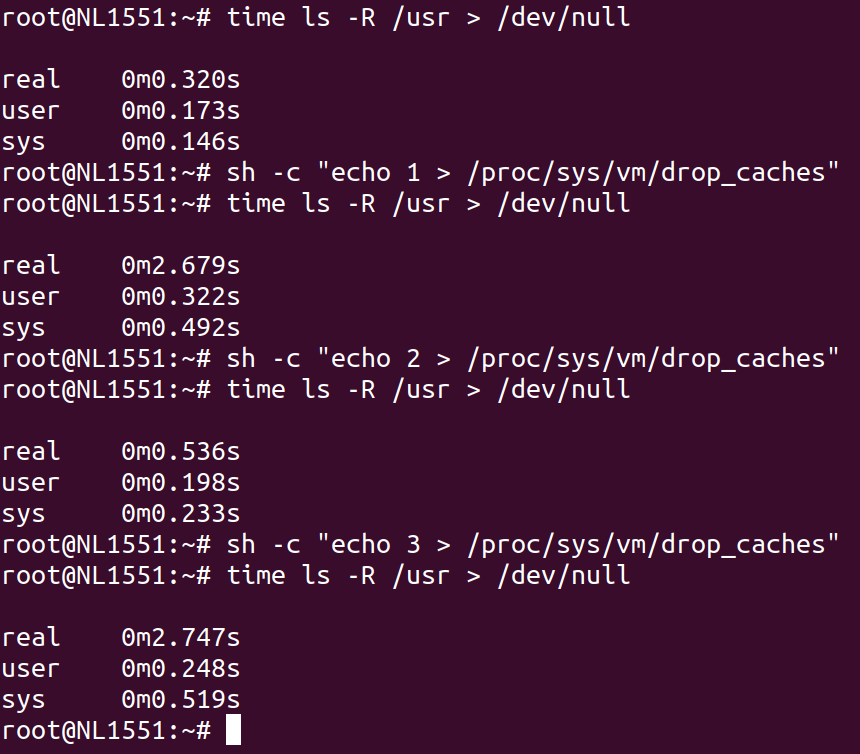
Your Test Results:
- Before Cache Clear:
- The first
ls -Rcommand runs quickly (0.343s) because both PageCache and dentry/inode caches are populated.
- The first
- After Clearing PageCache:
- After running
echo 1 > /proc/sys/vm/drop_caches, the secondls -Rcommand takes significantly longer (2.756s) because:- PageCache is cleared, so file contents must be reloaded from disk.
- However, dentries and inodes are not cleared, so some metadata is still available.
- After running
Why It Still Takes More Time:
The additional time comes from the fact that:
- After clearing the PageCache, the system has to read the file contents (or parts of the directory structure) from disk, which is slower than fetching them from memory.
- Even though dentries and inodes are still in memory, they depend on PageCache for efficient access to file content. So the system has to do extra work to populate the PageCache again.
- Directory traversal involves a combination of file metadata (dentries/inodes) and directory file contents (loaded via PageCache). Clearing just the PageCache impacts this process.
Solution to Test Dentry Cache Impact:
To focus solely on dentry and inode caches, you need to clear them explicitly with:
sh -c "echo 2 > /proc/sys/vm/drop_caches"
Then rerun:
time ls -R /usr > /dev/null
You’ll notice that this run will also take longer compared to when the dentry cache is intact, but the pattern will differ from clearing the PageCache.
Suggested Workflow to Understand All Cache Impacts:
- Baseline:
time ls -R /usr > /dev/null - Clear PageCache:
sh -c "echo 1 > /proc/sys/vm/drop_caches" time ls -R /usr > /dev/null - Clear Dentries and Inodes:
sh -c "echo 2 > /proc/sys/vm/drop_caches" time ls -R /usr > /dev/null - Clear Both PageCache and Dentries/Inodes:
sh -c "echo 3 > /proc/sys/vm/drop_caches" time ls -R /usr > /dev/null
This should give you a clear understanding of how each type of cache contributes to performance.
inotify
You can watch realtime operations happing in directory using inotifywatch and inotifywait command
Install inotify tool
sudo apt install inotify-toolsCreate directory
mkdir -p /tmp/testWatch action
inotifywatch -v -e modify,create,delete /tmp/test

Ctrl + C

#Then check statistics
Real time watch action
inotifywait -m -e modify,create,delete /tmp/test/inotifywait -m -r -e modify,create,delete /tmp/test/Now try to create modify and delete the file
touch /tmp/test/file1.txt
echo "Hello" > /tmp/test/file1.txt
rm /tmp/test/file1.txt

Ctrl + C
To monitor multiple paths at a time run following commands
inotifywatch -e access,modify /home/user/myfolder /home/user/another_folder /home/user/myfile.txt
OR
inotifywait -m -e access,modify /home/user/myfolder /home/user/another_folder /home/user/myfile.txt
Elastic Search
To check health
curl -X GET "localhost:9200/_cat/health"To list all index (tables)
curl -X GET "localhost:9200/_cat/indices"To delete existing index
curl -X DELETE localhost:9200/logsTo delete multiple indices at a time
curl -X DELETE localhost:9200/index1,index2,index3To create new index(table)
curl -X PUT localhost:9200/index1To insert new document
curl -X POST localhost:9200/users/_doc -H 'Content-Type: application/json' -d '{"name":"Shailesh", "age": 35, "city": "Nagpur"}'To list all documents
curl -X GET localhost:9200/users/_search?prettyTo limit / size
curl -X GET localhost:9200/users/_search -H 'Content-Type: application/json' -d '{"size":2}'To add limit with offset
curl -X GET localhost:9200/users/_search -H 'Content-Type: application/json' -d '{"from":3, "size":2}'To list with where clause and equal operator
curl -X GET localhost:9200/users/_search?pretty -H 'Content-Type: application/json' -d '{"query": {"match": {"name": "Shailesh"}}}'With like query
curl -X GET localhost:9200/users/_search?pretty -H 'Content-Type: application/json' -d '{"query": {"wildcard":{"name.keyword":"Shail*"}}}'With range
curl -X GET localhost:9200/users/_search -H 'Content-Type: application/json' -d '{"query": { "range" : {"salary": {"gt": 10000, "lt":30000}} } }'curl -X GET localhost:9200/users/_search -H 'Content-Type: application/json' -d '{"query": { "range" : {"salary": {"gte": 10000, "lte":30000}} } }'Select data from more than one index
curl -X GET localhost:9200/table1,table2/_searchcurl -X GET localhost:9200/table1,table2/_search -H 'Content-Type: application/json' -d '{"query": {"range": {"salary": {"gt": "20000"}}}}'This will search data from both the indices and will show all the documents whose salary is greater than 20000
Now the most important command, the full text search
curl -X GET "localhost:9200/users/_search?pretty" -H 'Content-Type: application/json' -d'
{
  "query": {
    "match": {
      "name": {
        "query": "Amit Desai",
        "operator": "and"
      }
    }
  }
}'
This will search amit and desai matches in any order, you can use or operator also if wanted to match any of the word from amit and desai
How to create rpm package
Install required tools
rpm -qa | grep rpmdevtools
yum list | grep rpmdevtools
yum install rpmdevtools
Create directory structure required for rpm build if not exist
rpmdev-setuptree
rpmbuild/
├── BUILD
├── RPMS
├── SOURCES
├── SPECS
└── SRPMS
Create source package under SOURCES
mkdir hello-0.0.1
cd hello-0.0.1
hello.sh
#!/bin/sh
echo "Hello world"
tar -cvzf hello-0.0.1.tar.gz hello-0.0.1Create spec file and make necessary changes
cd ~/rpmbuild/SPECS
rpmdev-newspec hello.spec
Name: hello
Version: 0.0.1
Release: 1%{?dist}
Summary: A simple hello world script
BuildArch: noarch
License: GPL
Source0: %{name}-%{version}.tar.gz
Requires: bash
%description
A demo RPM build
%prep
%setup -q
%install
rm -rf $RPM_BUILD_ROOT
mkdir -p $RPM_BUILD_ROOT/opt/hello
cp * $RPM_BUILD_ROOT/opt/hello
%clean
rm -rf $RPM_BUILD_ROOT
%files
/opt/hello/*
%postun
rm -vrf /opt/hello
%changelog
* Sun Feb 04 2024
- First version being packagedNow directory structure should look like this
/home/tux/rpmbuild/
├── BUILD
├── BUILDROOT
├── RPMS
├── SOURCES
│   └── hello-0.0.1.tar.gz
├── SPECS
│   └── hello.spec
└── SRPMS
Build rpm using following command
rpmbuild -ba SPECS/hello.specwhere -b is build a is for both source and binary
if you want only binary then put -bb flag
if you want only source then put -bs flag
Install the rpm using following command
sudo rpm -ivh ~/rpmbuild/RPMS/noarch/hello-0.0.1-1.el8.noarch.rpmVerify rpm installed successfully using following command
rpm -qi hello
tree /opt/hello
The %changelog entry of a package can be viewed, too:
rpm -q hello –changelog
Uninstall or erase installed rpm
sudo rpm -q | grep hello
sudo rpm -ve hello
Troubleshoot
To extract files and directories from rpm
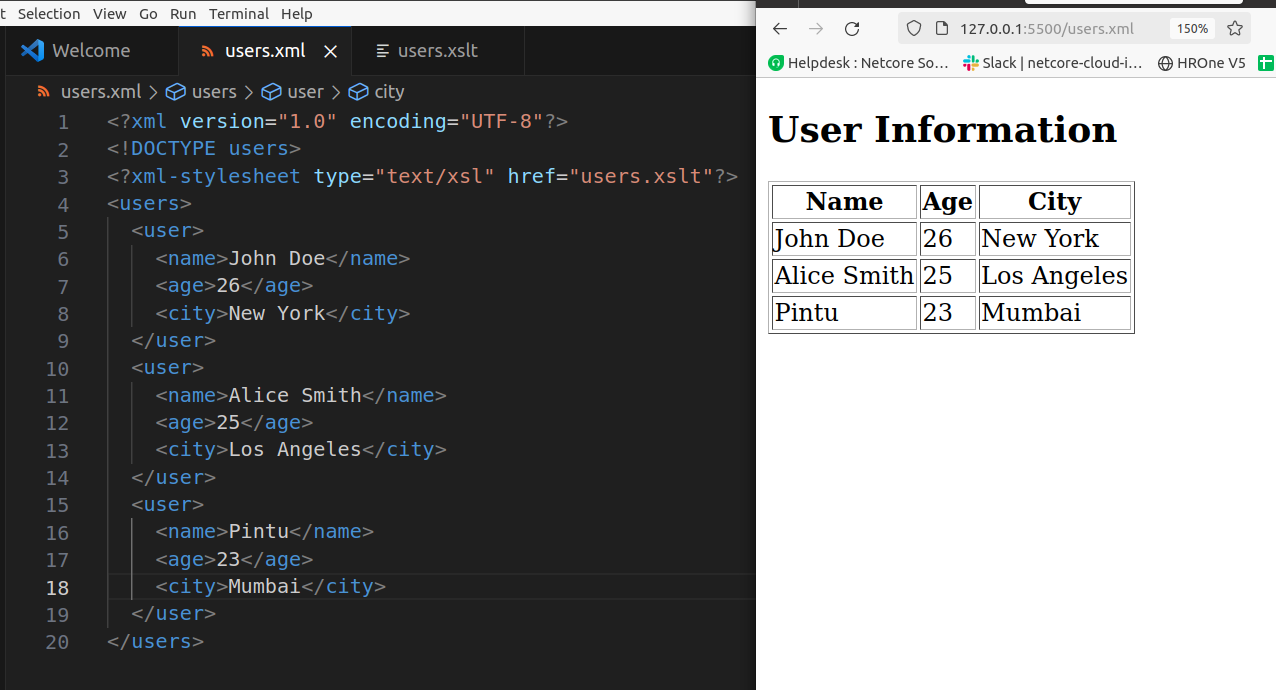
rpm2cpio hello-0.0.1-1.el8.noarch.rpm | cpio -idmvXML
users.xml
<?xml version="1.0" encoding="UTF-8"?>
<!DOCTYPE users>
<?xml-stylesheet type="text/xsl" href="users.xslt"?>
<users>
  <user>
    <name>John Doe</name>
    <age>26</age>
    <city>New York</city>
  </user>
  <user>
    <name>Alice Smith</name>
    <age>25</age>
    <city>Los Angeles</city>
  </user>
  <user>
    <name>Pintu</name>
    <age>23</age>
    <city>Mumbai</city>
  </user>
</users>
users.xslt
<?xml version="1.0" encoding="UTF-8"?>
<xsl:stylesheet version="1.0" xmlns:xsl="http://www.w3.org/1999/XSL/Transform">
  <xsl:output method="html" indent="yes"/>

  <xsl:template match="/users">
    <html>
      <head>
        <title>User Information</title>
      </head>
      <body>
        <h2>User Information</h2>
        <table border="1">
          <tr>
            <th>Name</th>
            <th>Age</th>
            <th>City</th>
          </tr>
          <xsl:for-each select="user">
            <tr>
              <td><xsl:value-of select="name"/></td>
              <td><xsl:value-of select="age"/></td>
              <td><xsl:value-of select="city"/></td>
            </tr>
          </xsl:for-each>
        </table>
      </body>
    </html>
  </xsl:template>
</xsl:stylesheet>
POC
Assignment
Remove city and use address with children city and state and then show same in html table

C++ Mini Project
Problem Statement
Company’s board member requested admin to provide MIS report of all employees with total, average, min, max, minimum salaried employees, maximum salaried employees and department wise salary.
You need to create a program for the same using following concepts of c++ programming language
- Encapsulation
- Abstraction
- Inheritance
MVPs
- P0
- Create a class Person with datamembers: name, age, city
- Create a class Employee which will inherit features of Person class with it’s own datamembers: empid, department, salary
- P1
- Create array of 10 employees and print its data using for loop
- P2
- Find and Print Total Salary, Average Salary, Max Salary, Min Salary
- P3
- Create function getMaxSalEmps() to print employees having highest salary
- Create function getMinSalEmps() to print all employees having minimum salary
- P4
- Create function getDeptWiseSalary() to print department wise total salary
Sample Output

How to deploy express app on netlify
Step 1: Login to netlify.com from browser (preferably from default browser using github account)
Install netlify locally
npm install netlify-cli -gLogin to netlify from console
netlify initStep 2: Create project locally with api file projectfolder/functions/api.js
const express = require('express');
const serverless = require('serverless-http');
const app = express();
const router = express.Router();

router.get('/', (req, res) => {
  res.send('App is running..');
});

app.use('/.netlify/functions/api', router);
module.exports.handler = serverless(app);

//const port = 8080;
//app.listen(process.env.PORT || port, () => {
//	console.log(`Listening on port ${port}`);
//});
Step 3: As we are deploying using lambda function create projectfolder/netlify.toml in project root directory
[build]
    functions = "functions"
Step 4: Modify package.json file
{
    "scripts": {
      "build": "netlify deploy --prod"
    },
    "dependencies": {
      "express": "^4.18.2",
      "netlify-cli": "^12.7.2",
      "netlify-lambda": "^2.0.15",
      "serverless-http": "^3.2.0"
    }
}
Step 5: Install required packages/modules
npm i expressStep 6: Test application locally
netlify functions:serve

Step 7: Build the project and deploy on netlify
NOTE: If you are running it for 1st time then chose Create & configure a new site
npm run build
Access api from browser/postman
https://yourproject.netlify.app/.netlify/functions/apiYou can check your functions api in netlify portal as well
https://app.netlify.com/sites/<your-project>/functions/api
CRUDL APP
api.js
const conn_str = "mongodb+srv://<username>:<password>@cluster0.<clusterid>.mongodb.net/<databasename>?retryWrites=true&w=majority";
const mongoose = require("mongoose");

mongoose.connect(conn_str)
.then(() => console.log("Connected successfully..."))
.catch( (error) => console.log(error) );


const express = require("express");
const serverless = require('serverless-http');
const app = express();
const router = express.Router();
var cors = require('cors')
app.use(express.json());
app.use(cors())

const empSchema = new mongoose.Schema(    {
    name: String,
    contact_number: String,
    address: String,
    salary: Number,
    employee_id: Number,
    role: String
});

const emp = mongoose.models.emps || new mongoose.model("emps", empSchema);

router.get('/', (req, res) => {
    res.send('App is running..');
});

router.get("/employees", async (req, res) => {
    // var data = [{name: "hari", salary: 25000}, {name: "sameer", salary: 23000}]
    let data = await emp.find();
    res.send(data)
})

//fetch single document by id
//http://localhost:8989/employees/657d397eea713389134d1ffa

router.get("/employees/:id", async (req, res) => {
    // console.log(req.params)
    let data = await emp.find({_id: req.params['id']});
    res.send(data[0])
})

//update document by id
router.put("/employees", async (req, res) => {

	let u_data = await emp.updateOne({"_id": req.body.id}, {
		"$set": {
			"name" : req.body.name,
			"salary" : req.body.salary,
		}
	});

	res.send(u_data);

})


//http://localhost:8989/employees?id=657d397eea713389134d1ffe
router.delete("/employees", async (req, res) => {
    let d_data = await emp.deleteOne({"_id": req.query['id']});
	res.send(d_data);
})

router.post("/employees", async (req, res) => {

    // doc = {
    //     "name":"harsha newly added",
    //     "contact_number":"9833910512",
    //     "address":"mumbai",
    //     "salary":20000,
    //     "employee_id":98829,
    //     "role":"operations"
    // }

    doc = req.body;

    let u = await emp(doc);
	let result = u.save();
	res.send(doc);

})

app.use('/.netlify/functions/api', router);
module.exports.handler = serverless(app);