How to deploy express app on netlify

Step 1: Login to netlify.com from browser (preferably from default browser using github account)

https://www.netlify.com/

Install netlify locally

npm install netlify-cli -g

Login to netlify from console

netlify init

Step 2: Create project locally with api file projectfolder/functions/api.js

const express = require('express');
const serverless = require('serverless-http');
const app = express();
const router = express.Router();

router.get('/', (req, res) => {
  res.send('App is running..');
});

app.use('/.netlify/functions/api', router);
module.exports.handler = serverless(app);

//const port = 8080;
//app.listen(process.env.PORT || port, () => {	
//	console.log(`Listening on port ${port}`);
//});

Step 3: As we are deploying using lambda function create projectfolder/netlify.toml in project root directory

[build]
    functions = "functions"

Step 4: Modify package.json file

{
    "scripts": {
      "build": "netlify deploy --prod"
    },
    "dependencies": {
      "express": "^4.18.2",
      "netlify-cli": "^12.7.2",
      "netlify-lambda": "^2.0.15",
      "serverless-http": "^3.2.0"
    }
}

Step 5: Install required packages/modules

npm i express

Step 6: Test application locally

netlify functions:serve

Step 7: Build the project and deploy on netlify

NOTE: If you are running it for 1st time then chose Create & configure a new site

npm run build

Access api from browser/postman

https://yourproject.netlify.app/.netlify/functions/api

You can check your functions api in netlify portal as well

https://app.netlify.com/sites/<your-project>/functions/api

CRUDL APP

api.js

const conn_str = "mongodb+srv://<username>:<password>@cluster0.<clusterid>.mongodb.net/<databasename>?retryWrites=true&w=majority";
const mongoose = require("mongoose");

mongoose.connect(conn_str)
.then(() => console.log("Connected successfully..."))
.catch( (error) => console.log(error) );


const express = require("express");
const serverless = require('serverless-http');
const app = express();
const router = express.Router();
var cors = require('cors')
app.use(express.json());
app.use(cors())

const empSchema = new mongoose.Schema(    {
    name: String,
    contact_number: String,
    address: String,
    salary: Number,
    employee_id: Number,
    role: String
});

const emp = mongoose.models.emps || new mongoose.model("emps", empSchema);

router.get('/', (req, res) => {
    res.send('App is running..');
});

router.get("/employees", async (req, res) => {
    // var data = [{name: "hari", salary: 25000}, {name: "sameer", salary: 23000}]
    let data = await emp.find();
    res.send(data)
})

//fetch single document by id
//http://localhost:8989/employees/657d397eea713389134d1ffa

router.get("/employees/:id", async (req, res) => {
    // console.log(req.params)
    let data = await emp.find({_id: req.params['id']});
    res.send(data[0])
})

//update document by id
router.put("/employees", async (req, res) => {

	let u_data = await emp.updateOne({"_id": req.body.id}, {
		"$set": {
			"name" : req.body.name,
			"salary" : req.body.salary,
		}
	});
	
	res.send(u_data);

})


//http://localhost:8989/employees?id=657d397eea713389134d1ffe
router.delete("/employees", async (req, res) => {
    let d_data = await emp.deleteOne({"_id": req.query['id']});
	res.send(d_data);
})

router.post("/employees", async (req, res) => {

    // doc = {
    //     "name":"harsha newly added",
    //     "contact_number":"9833910512",
    //     "address":"mumbai",
    //     "salary":20000,
    //     "employee_id":98829,
    //     "role":"operations"
    // }

    doc = req.body;

    let u = await emp(doc);
	let result = u.save();
	res.send(doc);

})

app.use('/.netlify/functions/api', router);
module.exports.handler = serverless(app);

Deploy From Gitlab To FTP Server

Create file gitlab-ci.yml in gitlab

variables:
  HOST: "yourFTPServer"
  USERNAME: "yourFTPServerUsername"
  PASSWORD: "yourFTPServerPassword"

deploy:
  script:
    - apt-get update -qq && apt-get install -y -qq lftp
    - lftp -c "set ftp:ssl-allow no; open -u $USERNAME,$PASSWORD $HOST; mirror -Rnev ./ ./htdocs --ignore-time --parallel=10 --exclude-glob .git* --exclude .git/"
  only:
    - master

NOTE: Make sure to change host, username, password and directory name where to deploy code

Ref: https://stackoverflow.com/questions/49632077/use-gitlab-pipeline-to-push-data-to-ftpserver

Docker Cheat Sheet

docker --version
docker version

Dockerfile

FROM php:7-apache
COPY . /var/www/html
WORKDIR /var/www/html
#CMD php index.php
EXPOSE 80
docker build -t helloworldphp7 .

To run docker image

docker run -p 8080:80 -v /c/xampp/htdocs/dockerdemo:/var/www/html -d php:8-apache

OR

docker run -p 8080:80 --name docker-apache -v /c/xampp/htdocs/dockerdemo:/var/www/html:ro -d php:8-apache

OR

docker run -d -p 8080:8080 --name jsp-project -v /root/jsp/:/usr/local/tomcat/webapps/test tomcat:9.0.1-jre8-alpine

To run docker image in interactive mode

docker container run -it <docker-image> /bin/bash

To List all images

docker images
docker images -q

To List all container

docker ps
docker ps -a
docker ps -aq

To remove image

docker rmi imagename

OR

docker rmi $(docker images -aq)

To remove container

docker rm <container-name>

OR

docker rm $(docker ps -aq)

OR

docker rm -f $(docker ps -aq)

To stop container

docker stop <container-name>

OR

docker stop $(docker ps -aq)

To push local image on docker hub

First create repository in dockerhub like we used to create in gitlab/github

docker login
docker tag firstimage YOUR_DOCKERHUB_NAME/firstimage
docker images
docker push YOUR_DOCKERHUB_NAME/firstimage

Working with MySQL

docker pull mysql/mysql-server:latest
docker images
docker create -v /var/lib/mysql --name mysqldata mysql/mysql-server:latest
docker ps -a
docker run -p 3307:3307 -d -e MYSQL_ROOT_PASSWORD=root --volumes-from mysqldata --name=mysqldb1 mysql/mysql-server:latest
docker ps
docker exec -it mysqldb1 bash
mysql -uroot -p

Hosting project on InfinityFree

Create account on InfinityFree : https://app.infinityfree.net/login
Note down account, MySQL and FTP details

Download FileZilla Client : https://filezilla-project.org/download.php?platform=win64

Export database table : SQL Cheat Sheet (codeinsightacademy.com)

Go to control panel/ databases/phpmyadmin
Create database and import database table in phpmyadmin of infinityfree

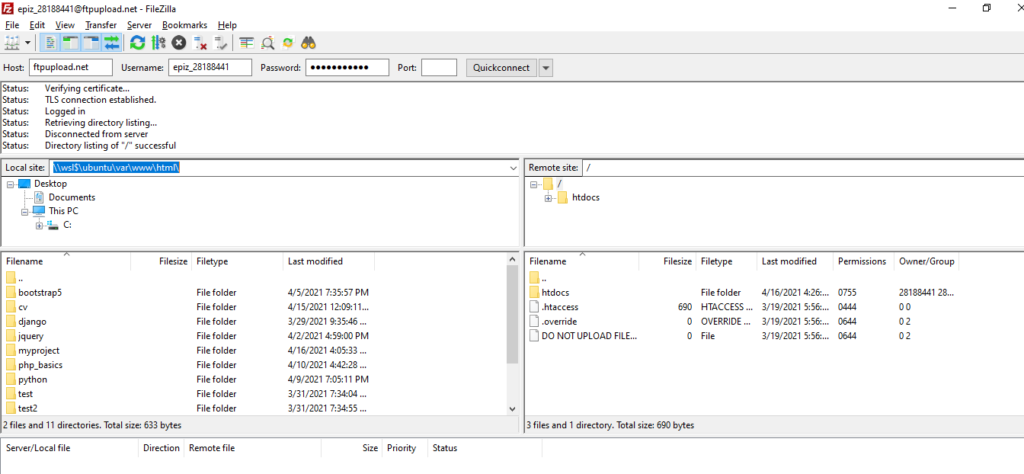
Connect to infinityfree server using FTP credentials via FileZilla Client
Once connection is established upload project folder from local site to /htdocs of remote site

Change the database connection credentials (MYSQL username, password, database_name) in project as per MYSQL credentials of infinityfree.

Your project is hosted. refresh the browser and check.

Install Jenkins on Ubuntu

sudo apt update
sudo apt install default-jdk default-jre
javac
wget -q -O - https://pkg.jenkins.io/debian/jenkins.io.key | sudo apt-key add -
sudo sh -c "echo deb http://pkg.jenkins.io/debian-stable binary/ > /etc/apt/sources.list.d/jenkins.list"
sudo apt update
sudo apt install jenkins
sudo service jenkins start
sudo service jenkins status

Open Browser and hit following url

http://localhost:8080/

To view default initial password

sudo cat /var/lib/jenkins/secrets/initialAdminPassword

Install recommended Plugins. Make sure Git Plugin is installed

Username: admin
Password: Shift + 5
Full name: Administrator

Jenkins URL: http://localhost:8080/
Or
http://youripaddress:8080/
Or
http://yourdomain:8080/

Create New Item (New project for build)

Create release_project.sh file

rsync -av --exclude-from='.releaseignore' <src_dir_path> <dest_dir_path>

Add files and directories entries in .releaseignore file to skip rsync

node_modules
.git
private_documents

After creating freestyle project if you face any permission issue then try one of the following solutions

sudo su -
vim /etc/sudoers

Add following entry at end of file

#add jenkins as sudoer
jenkins        ALL=(ALL)       NOPASSWD: ALL

OR add user to the group

sudo usermod -a -G sudo jenkins

Ref:
medium.com
stackoverflow

Git Ftp

NOTE: Run all commands from your projects root directory

#onetime
sudo apt-get install git-ftp

#onetime NOTE: PLEASE CHANGE WITH YOUR FTP SERVER URL
git config git-ftp.url "ftpupload.net"

#onetime NOTE: PLEASE CHANGE WITH YOUR FTP USERNAME
git config git-ftp.user "ftp-username"

#onetime NOTE: PLEASE CHANGE WITH YOUR FTP PASSWORD
git config git-ftp.password "ftp-password"

#onetime
git config git-ftp.syncroot .

#onetime
git ftp init --remote-root htdocs

git ftp push --remote-root htdocs

if you want to ignore files then create .git-ftp-ignore and add entries in this file

Ref:

https://www.codegrepper.com/code-examples/shell/git+ftp+empty+string+is+not+a+valid+pathspec.+please+use+.+instead+if+you+meant+to+match+all+paths

https://www.zyxware.com/articles/4192/how-to-deploy-files-from-a-git-repository-via-ftp

https://github.com/git-ftp/git-ftp

https://zoomadmin.com/HowToInstall/UbuntuPackage/git-ftp

https://github.com/git-ftp/git-ftp/blob/master/INSTALL.md#debian-ubuntu-and-others-using-apt

https://git-ftp.github.io/

https://github.com/git-ftp/git-ftp/blob/master/man/git-ftp.1.md