Django REST framework Cheat Sheet

Django Cheat Sheet (codeinsightacademy.com)

pip3 install djangorestframework
python3 manage.py startapp employee
Note: Make sure your sql service is running.

settings.py

INSTALLED_APPS = [
    'django.contrib.admin',
    'django.contrib.auth',
    'django.contrib.contenttypes',
    'django.contrib.sessions',
    'django.contrib.messages',
    'django.contrib.staticfiles',
    'webpage',
    'rest_framework',
    'employee',
]

employee/models.py

from django.db import models

class Employee(models.Model):
    post = models.CharField(max_length = 100)
    name = models.CharField(max_length = 100)
    salary = models.IntegerField()
    is_active = models.BooleanField(default=False)
    added_date = models.DateField(auto_created=True)
    updated_date = models.DateField(auto_now=True)

    def __str___(self):
        return self.title

to make and apply the migrations run

./manage.py makemigrations
./manage.py migrate

employee/serializers.py

from rest_framework import serializers
from employee.models import Employee

class EmployeeSerializer(serializers.ModelSerializer):
    class Meta:
        model = Employee
        fields = "__all__"

employee/views.py

from django.shortcuts import render
from rest_framework.generics import ListAPIView
from rest_framework.generics import CreateAPIView
from rest_framework.generics import DestroyAPIView
from rest_framework.generics import UpdateAPIView
from employee.serializers import EmployeeSerializer
from employee.models import Employee

class ListEmpAPIView(ListAPIView):
    queryset = Employee.objects.all()
    serializer_class = EmployeeSerializer

class CreateEmpAPIView(CreateAPIView):
    queryset = Employee.objects.all()
    serializer_class = EmployeeSerializer

class UpdateEmpAPIView(UpdateAPIView):
    queryset = Employee.objects.all()
    serializer_class = EmployeeSerializer

class DeleteEmpAPIView(DestroyAPIView):
    queryset = Employee.objects.all()
    serializer_class = EmployeeSerializer

employee/urls.py

from django.urls import path
from employee import views

urlpatterns = [
    path("",views.ListEmpAPIView.as_view(),name="employee_list"),
    path("create/", views.CreateEmpAPIView.as_view(),name="employee_create"),
    path("update/<int:pk>/",views.UpdateEmpAPIView.as_view(),name="update_employee"),
    path("delete/<int:pk>/",views.DeleteEmpAPIView.as_view(),name="delete_employee")
]

main urls.py

urlpatterns = [
path('admin/', admin.site.urls),
path('api/v1/employee/',include("employee.urls"))
]

Run the api in postman with urls

POST request : http://localhost:8000/api/v1/employee/create/ 
GET request : http://localhost:8000/api/v1/employee
UPDATE request : http://localhost:8000/api/v1/employee/update/1/ 
DELETE request : http://localhost:8000/api/v1/employee/delete/1/ 

Hosting project on InfinityFree

Create account on InfinityFree : https://app.infinityfree.net/login
Note down account, MySQL and FTP details

Download FileZilla Client : https://filezilla-project.org/download.php?platform=win64

Export database table : SQL Cheat Sheet (codeinsightacademy.com)

Go to control panel/ databases/phpmyadmin
Create database and import database table in phpmyadmin of infinityfree

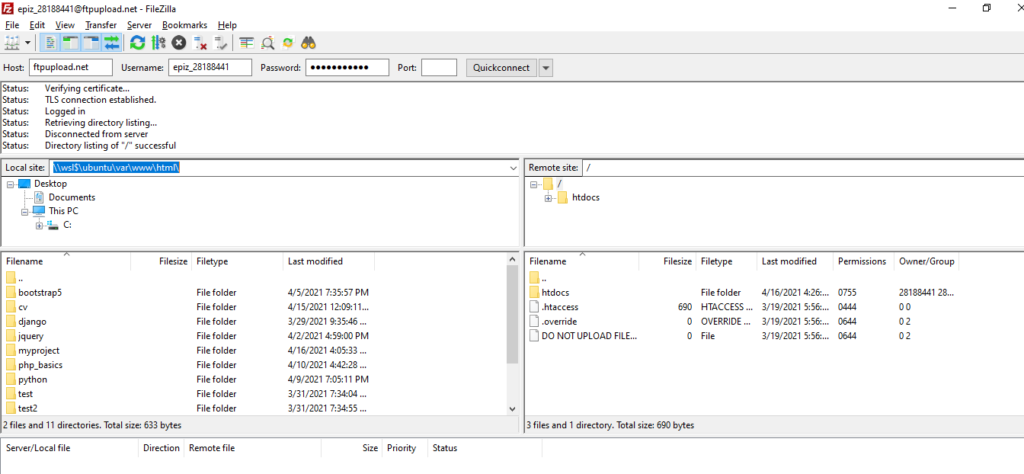
Connect to infinityfree server using FTP credentials via FileZilla Client
Once connection is established upload project folder from local site to /htdocs of remote site

Change the database connection credentials (MYSQL username, password, database_name) in project as per MYSQL credentials of infinityfree.

Your project is hosted. refresh the browser and check.

Install Jenkins on Ubuntu

sudo apt update
sudo apt install default-jdk default-jre
javac
wget -q -O - https://pkg.jenkins.io/debian/jenkins.io.key | sudo apt-key add -
sudo sh -c "echo deb http://pkg.jenkins.io/debian-stable binary/ > /etc/apt/sources.list.d/jenkins.list"
sudo apt update
sudo apt install jenkins
sudo service jenkins start
sudo service jenkins status

Open Browser and hit following url

http://localhost:8080/

To view default initial password

sudo cat /var/lib/jenkins/secrets/initialAdminPassword

Install recommended Plugins. Make sure Git Plugin is installed

Username: admin
Password: Shift + 5
Full name: Administrator

Jenkins URL: http://localhost:8080/
Or
http://youripaddress:8080/
Or
http://yourdomain:8080/

Create New Item (New project for build)

Create release_project.sh file

rsync -av --exclude-from='.releaseignore' <src_dir_path> <dest_dir_path>

Add files and directories entries in .releaseignore file to skip rsync

node_modules
.git
private_documents

After creating freestyle project if you face any permission issue then try one of the following solutions

sudo su -
vim /etc/sudoers

Add following entry at end of file

#add jenkins as sudoer
jenkins        ALL=(ALL)       NOPASSWD: ALL

OR add user to the group

sudo usermod -a -G sudo jenkins

Ref:
medium.com
stackoverflow

vim cheat sheet

to open file

vim filename

copy/cut paste

yy => p
dd => p
v => select lines to copy => y => goto line where need to paste => p
v => select lines to cut => d => goto line where need to paste => p

to undo and redo

Esc
u u u u 

Esc
Ctrl + R Ctrl + R

to open file in read mode

vim -R filename

to open file on specific line number

vim filename +10

insert mode

i
o

escape / command mode

Esc

to write file

:w
:wq
:x

to minimize vim editor

Ctrl + Z

to see minimized files in vim

jobs

to see background job

bg

to open specific jobs or bring it to foreground

fg 1
fg +
fg -

search any word in vim editor

/word
/word\c
/word\C
#then press N or Shift + N

search and replace word

:%s/word/replacewith/i
:%s/word/replacewith/g

go to specific line

:10
:1
:$

show/hide line numbers in vim editor

:set number
:set nonumber

set tabstop

:set tabstop=4

set font color

:colorscheme murphy

vimdiff difference between 2 files

vimdiff file1 file2
#difference put
dp
#difference obtain
do

SQL Cheat Sheet

login to database

mysql -u username -p'password' database_name

logout from database

Ctrl + D

list all database

SHOW DATABASES;

Create Database

CREATE DATABASE company;

enter database

USE database_name;

show current database (dual is dummy/virtual database provided by oracle)

SELECT DATABASE() FROM dual;

list all tables

SHOW TABLES;

list table pattern

SHOW TABLES LIKE '%table_substring%';

Create table

CREATE TABLE users(
    id INT,
    NAME VARCHAR(100) NOT NULL,
    age TINYINT NOT NULL,
    city VARCHAR(200) NOT NULL
);

Alter table

ALTER TABLE
    users MODIFY id INT PRIMARY KEY AUTO_INCREMENT;
ALTER TABLE
    users ADD added_at DATETIME AFTER `city`,
    ADD updated_at DATETIME AFTER added_at;

show schema

DESC <table_name>;
SHOW CREATE TABLE <table_name>\G;

show running sql processes

SHOW FULL PROCESSLIST;

import database/table (RUN IN BASH TERMINAL)
NOTE: Make sure your database is present in mysql server if not create new one

mysql -u root -p'password' database_name < backup_file.sql

export database (all tables) (RUN IN BASH TERMINAL)

mysqldump -u root -p'password' database_name > backup_file.sql

export specific tables (RUN IN BASH TERMINAL)

mysqldump -u root -p'password' database_name tbl1 tbl2 tbl3 > backup_file.sql

export only schema without data

mysqldump -u root -p'password' database_name --no-data 

run sql command in terminal

mysql -u root -p'password' -e "SELECT COUNT(*) FROM database_name.table_name"

copy table

CREATE TABLE copy_of_table AS SELECT * FROM existing_table_name;

copy only table structure

CREATE TABLE copy_of_table AS SELECT * FROM existing_table_name WHERE 1 > 2;

Create new database user

CREATE USER 'user'@'hostname' IDENTIFIED BY 'PassWord';

To give remote access

GRANT ALL ON database_name.* to 'database_username'@'10.24.96.%' IDENTIFIED BY 'database_password';

CRUD SQL

SELECT * FROM users ORDER BY id DESC;

DELETE FROM users WHERE id = 3;

INSERT INTO users (id, name, age, city, added_at, updated_at) VALUES (NULL, 'sonam gupta', 18, 'gorakhpur', NOW(), NOW());

UPDATE users SET name = 'Sonam Gupta', age = 20, city = 'Gorakhpur', updated_at = NOW() WHERE id = 5;

Ref Links: