Project: Employee Management CRUD System Date: July 27, 2025 Author: [Your Name]
1. Purpose & Background
The Employee Management CRUD System aims to provide a simple web-based interface and REST API to manage employee records efficiently. It fulfills the need to maintain essential employee data such as ID, name, department, and salary with complete create, read, update, and delete functionalities.
This product will be used internally by HR staff and managers to maintain an up-to-date employee database with easy access to employee details.
2. Objectives & Goals
Enable users to list all employees in a readable tabular format.
Allow users to add new employees with required fields (name, department, salary).
Support editing employee details with a pre-filled form.
Provide a read-only detailed view of individual employees.
Allow deletion of employees with user confirmation.
REST API endpoints should support all CRUD operations for integration or future enhancements.
The UI should be intuitive with responsive, clear action buttons (View, Edit, Delete).
3. Stakeholders
Stakeholder
Role
Responsibility
Product Manager
Oversees requirements & scope
Define features and priorities
Frontend Developer
Implements HTML + Axios views
Build UI pages and integrate API calls
Backend Developer
Develops REST API
Implement API endpoints for employee data
QA Tester
Quality assurance
Test functionality and user experience
HR Users
End users
Use product to manage employee records
4. User Stories
As an HR user, I want to see all employees listed, so that I can find and review employee info quickly.
As an HR user, I want to add a new employee, so that I can keep records of newly hired staff.
As an HR user, I want to edit employee details, so that I can update information if there are changes.
As an HR user, I want to delete an employee, so that I can remove records of former employees.
As an HR user, I want to view detailed employee information, so I can get a focused read-only snapshot of an individual’s record.
5. Functional Requirements
ID
Requirement Description
Priority
Notes
FR-01
The system shall display a list of employees with fields: ID, Name, Department, Salary.
High
See listing.html
FR-02
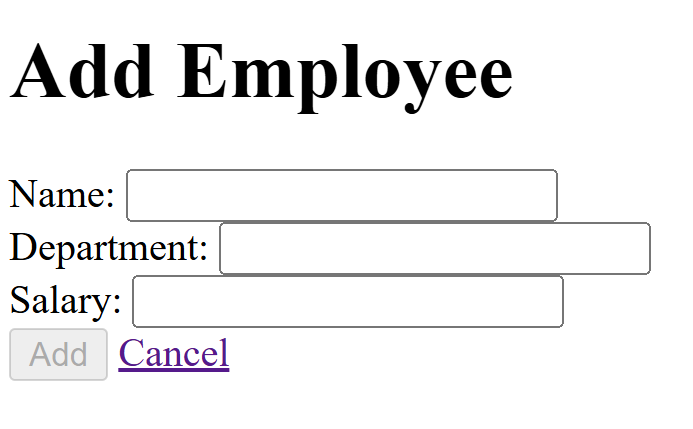
The system shall allow adding a new employee with Name, Department, Salary.
High
add.html form submission using Axios
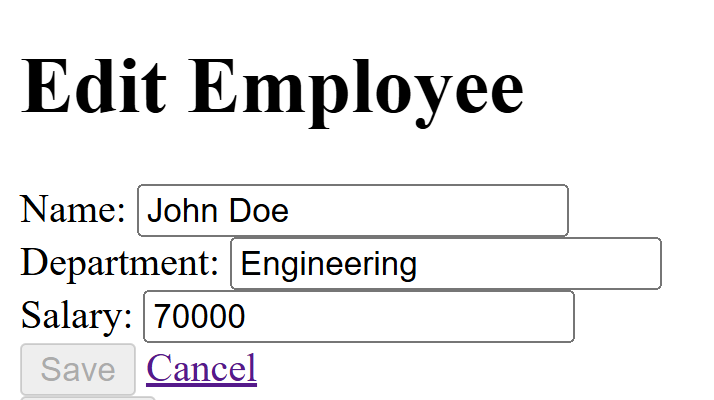
FR-03
The system shall allow editing existing employee details via a pre-filled form.
High
edit.html with PUT API call
FR-04
The system shall allow deletion of an employee with a confirmation popup.
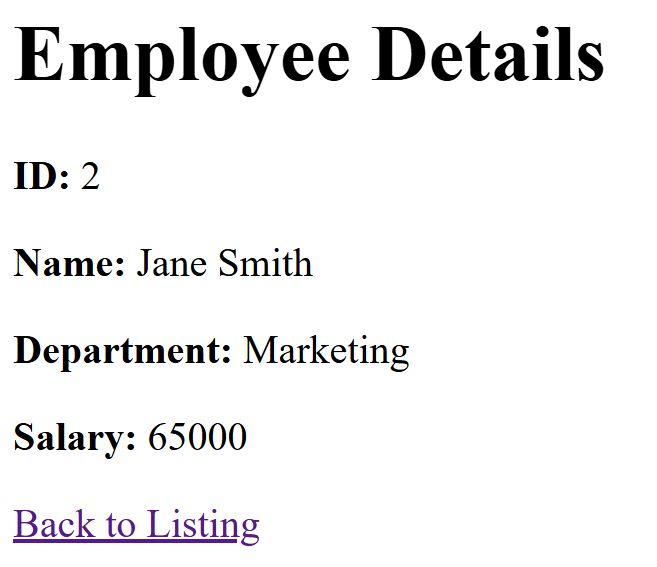
The system shall provide a read-only details page to view employee records individually.
Medium
details.html showing employee details
FR-06
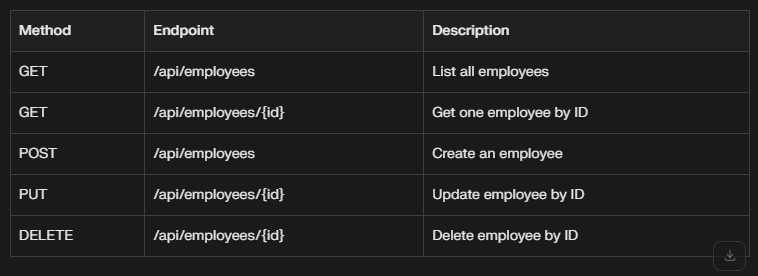
The system shall expose the following REST API endpoints: GET /employees, GET /employees/{id}, POST /employees, PUT /employees/{id}, DELETE /employees/{id}.
High
Backend API support required
6. Non-functional Requirements
Requirement Description
Notes
The system should be responsive and load employee data quickly.
Performance: API responses under 2 seconds
Data should be validated on client and server-side.
Name and Department non-empty, Salary positive number
System should handle concurrency safely (no data conflicts).
Backend-managed
Security: API endpoints to be secured with authentication (future scope).
Currently internal use
7. User Interface / UX
Tables with borders and clear labeling for readability.
Action buttons for View, Edit, Delete placed on each row.
Modals or confirm popups for delete actions to prevent accidental deletions.
Forms for Add and Edit with required field validation.
Navigation links to switch between listing, add, edit, and details pages.
8. API Specification
Method
Endpoint
Description
Request Body
Response
GET
/api/employees
Retrieve list of all employees
None
Array of employee objects
GET
/api/employees/{id}
Retrieve one employee by ID
None
Employee object
POST
/api/employees
Create a new employee
JSON with name, department, salary
Created employee object
PUT
/api/employees/{id}
Update employee by ID
JSON with fields to update
Updated employee object
DELETE
/api/employees/{id}
Delete employee by ID
None
Success status
9. Success Metrics
100% of employee records can be created, viewed, updated, and deleted successfully without errors.
User confirmation for delete reduces unintended deletions by 90%.
UI loads employee listings and details pages within 2 seconds for up to 1000 records.
Positive user feedback from HR team on usability (survey post-release).
10. Timeline & Milestones
Milestone
Target Date
Notes
PRD Approval
[Date]
Finalize product requirements document.
Design & UI Mockups
+1 week
Design review for all pages.
Backend API Development
+3 weeks
REST API endpoints complete.
Frontend Development
+4 weeks
Integrate UI with API and build views.
QA Testing
+5 weeks
Functional and usability testing.
Deployment
+6 weeks
Release to production environment.
11. Constraints & Assumptions
Current version targets internal HR users only.
Authentication & authorization to be added later.
Backend API under development or assumed ready to accept calls as described.
UI will be web-based, supported in modern browsers.
12. Appendix
Sample UI HTML files: listing.html, add.html, edit.html, details.html
Axios usage examples for API communication.
API specification document (Swagger/OpenAPI recommended for future).
Certainly! Here are ten examples for each of the topics you mentioned:
BASICS
Basics: Example 1: Printing a message
print("Hello, World!")
Example 2: Arithmetic operations
   a = 10
   b = 5
   print("Addition:", a + b)
   print("Subtraction:", a - b)
   print("Multiplication:", a * b)
   print("Division:", a / b)
   print("Modulo:", a % b)
Example 3: String concatenation
   name = "Alice"
   age = 25
   print("My name is " + name + " and I am " + str(age) + " years old.")
Example 4: Using the input function
   name = input("Enter your name: ")
   print("Hello, " + name + "!")
Example 5: Conditional statements
   num = int(input("Enter a number: "))
   if num > 0:
       print("The number is positive.")
   elif num < 0:
       print("The number is negative.")
   else:
       print("The number is zero.")
   text = "Hello, World!"
   print("Length:", len(text))
Example 9: Using the str() function
   num = 42
   text = "The answer is: " + str(num)
   print(text)
Example 10: Importing and using modules
   import math

   radius = 5
   area = math.pi * radius ** 2
   print("Area of the circle:", area)
CONDITIONAL STATEMENTS IF ELSE
If-Else Statements: Example 1: Checking if a number is even or odd
   num = int(input("Enter a number: "))
   if num % 2 == 0:
       print("The number is even.")
   else:
       print("The number is odd.")
Example 2: Checking if a year is a leap year
   year = int(input("Enter a year: "))
   if year % 400 == 0 or (year % 4 == 0 and year % 100 != 0):
       print("The year is a leap year.")
   else:
       print("The year is not a leap year.")
Example 3: Determining the maximum of three numbers
   num1 = float(input("Enter the first number: "))
   num2 = float(input("Enter the second number: "))
   num3 = float(input("Enter the third number: "))
   max_num = max(num1, num2, num3)
   print("The maximum number is:", max_num)
Example 4: Checking if a student passed or failed
   score = float(input("Enter the student's score: "))
   if score >= 60:
       print("The student passed.")
   else:
       print("The student failed.")
Example 5
: Categorizing a number into different ranges
   num = float(input("Enter a number: "))
   if num < 0:
       print("The number is negative.")
   elif num >= 0 and num <= 10:
       print("The number is between 0 and 10.")
   elif num > 10 and num <= 20:
       print("The number is between 10 and 20.")
   else:
       print("The number is greater than 20.")
Example 6: Checking if a person is eligible to vote
   age = int(input("Enter your age: "))
   if age >= 18:
       print("You are eligible to vote.")
   else:
       print("You are not eligible to vote yet.")
Example 7: Checking if a number is positive, negative, or zero (alternative approach)
   num = float(input("Enter a number: "))
   if num > 0:
       print("The number is positive.")
   elif num < 0:
       print("The number is negative.")
   else:
       print("The number is zero.")
Example 8: Checking if a character is a vowel or consonant
   char = input("Enter a character: ").lower()
   if char in ['a', 'e', 'i', 'o', 'u']:
       print("The character is a vowel.")
   else:
       print("The character is a consonant.")
Example 9: Checking if a number is a multiple of another number
   num1 = int(input("Enter the first number: "))
   num2 = int(input("Enter the second number: "))
   if num1 % num2 == 0:
       print(num1, "is a multiple of", num2)
   else:
       print(num1, "is not a multiple of", num2)
Example 10: Checking if a year is a leap year (alternative approach)
   year = int(input("Enter a year: "))
   if year % 400 == 0 or (year % 4 == 0 and year % 100 != 0):
       print("The year is a leap year.")
   else:
       print("The year is not a leap year.")
For loop with range
Printing numbers from 0 to 9:
for i in range(10):
    print(i)
Printing even numbers from 2 to 10:
for i in range(2, 11, 2):
    print(i)
Calculating the sum of numbers from 1 to 100:
total = 0
for i in range(1, 101):
    total += i
print("Sum:", total)
Printing numbers in reverse order from 9 to 0:
for i in range(9, -1, -1):
    print(i)
Multiplying each number in the range by 2 and printing the result:
for i in range(10):
    result = i * 2
    print(result)
Printing the square of each number in the range from 1 to 5:
for i in range(1, 6):
    square = i ** 2
    print(square)
Printing numbers in increments of 5 from 0 to 50:
for i in range(0, 51, 5):
    print(i)
Checking if a number is divisible by 3 in the range from 1 to 20:
for i in range(1, 21):
    if i % 3 == 0:
        print(i, "is divisible by 3")
Printing the ASCII value of each character in a string:
text = "Hello"
for char in text:
    ascii_value = ord(char)
    print(char, ":", ascii_value)
Repeating a specific action a certain number of times using range:
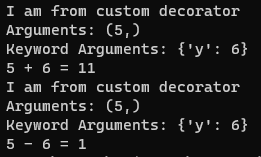
Keyword arguments (or named arguments) are values that, when passed into a function, are identifiable by specific parameter names. A keyword argument is preceded by a parameter and the assignment operator, = . Keyword arguments can be likened to dictionaries in that they map a value to a keyword.
A decorator is a design pattern in Python that allows a user to add new functionality to an existing object without modifying its structure. Decorators are usually called before the definition of a function you want to decorate.
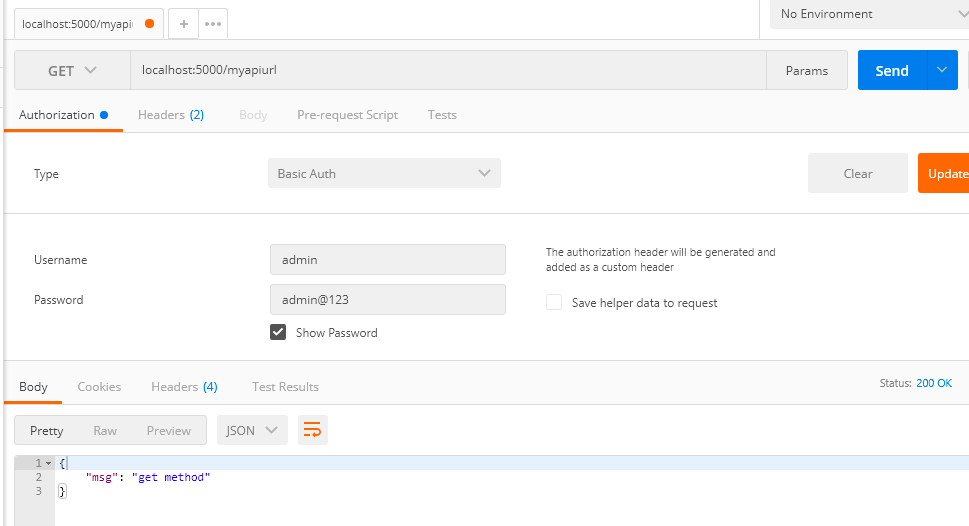
Flask is a micro web framework written in Python. It is classified as a microframework because it does not require particular tools or libraries. It has no database abstraction layer, form validation, or any other components where pre-existing third-party libraries provide common functions.
install flask module
python -m pip install Flask
hello world
from flask import Flask, jsonify, request, render_template

app = Flask(__name__)

#YOUR FUNCTIONS HERE

if __name__ == "__main__":
    app.run(debug=True);
    #app.run(host="0.0.0.0", port=int("1234"), debug=True)
render html template [NOTE: MAKE SURE TO KEEP ALL TEMPLATE FILES IN templates DIRECTORY]
@app.route('/')
def index():
    #return "Hello World";

    data = {'company_name': "TCET"}
    return render_template('hello_world.html', data = data)
templates/hello_world.html
<h1>Hello World</h1>
<h3>Welcome to {{data['company_name']}}</h3>
from flask import Flask, jsonify, request
from flask_cors import CORS
import pymysql

app = Flask(__name__)
cors = CORS(app)

@app.route('/users', methods=['GET'])
def get_users():
    # To connect MySQL database
    conn = pymysql.connect(host='localhost', user='root', password = "", db='databasename')

    cur = conn.cursor()
    cur.execute("select * from users LIMIT 10")
    output = cur.fetchall()

    print(type(output)); #this will print tuple

    for rec in output:
        print(rec);

    # To close the connection
    conn.close()

    return jsonify(output);
from django.db import models

class Employee(models.Model):
    post = models.CharField(max_length = 100)
    name = models.CharField(max_length = 100)
    salary = models.IntegerField()
    is_active = models.BooleanField(default=False)
    added_date = models.DateField(auto_created=True)
    updated_date = models.DateField(auto_now=True)

    def __str___(self):
        return self.title
to make and apply the migrations run
./manage.py makemigrations
./manage.py migrate
employee/serializers.py
from rest_framework import serializers
from employee.models import Employee

class EmployeeSerializer(serializers.ModelSerializer):
    class Meta:
        model = Employee
        fields = "__all__"
employee/views.py
from django.shortcuts import render
from rest_framework.generics import ListAPIView
from rest_framework.generics import CreateAPIView
from rest_framework.generics import DestroyAPIView
from rest_framework.generics import UpdateAPIView
from employee.serializers import EmployeeSerializer
from employee.models import Employee

class ListEmpAPIView(ListAPIView):
    queryset = Employee.objects.all()
    serializer_class = EmployeeSerializer

class CreateEmpAPIView(CreateAPIView):
    queryset = Employee.objects.all()
    serializer_class = EmployeeSerializer

class UpdateEmpAPIView(UpdateAPIView):
    queryset = Employee.objects.all()
    serializer_class = EmployeeSerializer

class DeleteEmpAPIView(DestroyAPIView):
    queryset = Employee.objects.all()
    serializer_class = EmployeeSerializer
employee/urls.py
from django.urls import path
from employee import views

urlpatterns = [
    path("",views.ListEmpAPIView.as_view(),name="employee_list"),
    path("create/", views.CreateEmpAPIView.as_view(),name="employee_create"),
    path("update/<int:pk>/",views.UpdateEmpAPIView.as_view(),name="update_employee"),
    path("delete/<int:pk>/",views.DeleteEmpAPIView.as_view(),name="delete_employee")
]
DATABASES = {
    'default': {
        'ENGINE': 'django.db.backends.mysql',
        'NAME': 'DB_NAME',
        'USER': 'DB_USER',
        'PASSWORD': 'DB_PASSWORD',
        'HOST': 'localhost',   # Or an IP Address that your DB is hosted on
        'PORT': '3306',
    }
}
open db shell with default connection
python manage.py dbshell
MySql Database Connection Troubleshoot in Windows OS Download whl package which is compatible with your python version https://www.lfd.uci.edu/~gohlke/pythonlibs/ Find: mysqlclient
To check whether python is 32 or 64 bit just run following command
queryset = ModelName.objects.filter(column=value)
queryset = ModelName.objects.get(column=value) #this will give you single record
queryset = ModelName.objects.filter(column__iexact=value, column2__exact=value2)
queryset = ModelName.objects.filter(col__subcol=value) #for relationship
Here are simple steps to create hello world web application in python using django framework
Step 1: Install virtual environment and create virtual environment for your project
pipinstallvirtualenvwrapper-win
mkvirtualenvmyproject
pip install virtualenv
virtualenv name_to_your_env
name_to_your_env\Scripts\activate
After activation

$ django-admin.py startproject HelloWorld  $ cd HelloWorld
$ ls HelloWorld manage.py
$ python manage.py runserver
Validating models...
0 errors found ...
Django version 1.6.5, using settings 'HelloWorld.settings'
Starting development server at http://127.0.0.1:8000/
Quit the server with CONTROL-C.
$ django-admin startapp HelloWorldApp
$ ls
HelloWorld HelloWorldApp manage.py
WAP to read a matrix of size 3 X 5 and find their SUM
WAP to read a matrix of size 3 X 5 and find sum of each ROW
WAP to read a matrix of size 3 X 3 and check if it is NULL or NOT
WAP to read a matrix of size 3 X 5 and count all EVEN and ODD numbers
WAP to read matrix of size 3 X 3 and check if it is UNIT Matrix or NOT
WAP to read 2 matrix of size 3 X 3 and find their Addition
WAP to read 2 matrix of size 3 X 3 and find their Product
WAP to read matrix of size 3 X 3 and find its Transpose
WAP to read matrix of size 3 X 3 and find its Transpose without using second matrix
WAP to read matrix of size 3 X 3 and find its Upper Triangular Matrix
WAP to read matrix of size 3 X 3 and find its Lower Triangular Matrix
WAP to read matrix of size 3 X 3 and check if sum of its diagonal is same or not
WAP to read matrix of size 3 X 3 and check if sum of its middle row is same as sum of its middle column
WAP to create TIC-TAC-TOE by showing number and take 9 inputs from 2 users.
[box title=”” bg_color=”#dbdbdb” align=”left”]1 2 3
4 5 6
7 8 9
[/box]
[box title=”” bg_color=”#dbdbdb” align=”left”]X O X
O X O
O O X
[/box]
PLAYER 1 WIN
[box title=”” bg_color=”#dbdbdb” align=”left”]O X O
X O X
O X O
[/box]
PLAYER 2 WIN