- What is the difference between html and html5
- Tag name available in html5
- What is javascript
- What is ajax and its benefits
- what is the different type of request available in ajax
- what is jquery and its benefits
- Main difference between javascript and jquery
- Event in jquery
- example of jquery event
- what is difference between CSS and CSS3
- what is media query in CSS
- What is bootstrap
- what is grid system in bootstrap
- What is JSON
- What is API
- What is PHP
- what is variable in PHP
- what types of variable available in PHP
- what is array in PHP
- how many types of array available in PHP
- difference between associative array and multidimentional array
- Difference between library function and user defined function in php
- Give me example of library function
- Difference between sessions and cookies
- What is difference between get and post method
- What is database
- What is table
- What is database MYSQL queries
- Type of relationship available in MYSQL
- Which datatype is use to store image in table
- What is OOPS
- Difference between classes and objects
- What is the different type array function in PHP
- Difference between concat() and array_push()
- Difference between constructor() and destructor()
- Types of error available in PHP
- Difference between library file and helper file
- Give me any three datatype of date and time
- What is blob in MYSQL
- Difference between RDBMS and DBMS
- Difference between string datatype and varchar datatype
- Difference between text datatype and String datatype
- What is datatype in MYSQL
- What are the meaning of classes and objects
- Difference between argument and parameter
- difference between cookies and local storage
- what is the difference between session storage and local storage
- Difference between notice error and warning error
- What is the library
- Difference between authentication and authorization
- What is MVC
- What is polymorphism
- Difference between Primary key and foreign key
- What is the full form of DOM and give its types
- Can table have more than one primary key
Author: admin
Interceptor
index.js
import React from 'react';
import ReactDOM from 'react-dom/client';
import './index.css';
import App from './App';
import reportWebVitals from './reportWebVitals';
import axios from 'axios';
// Add a request interceptor
axios.interceptors.request.use(
  config => {
    console.log("inside interceptor request", config)

    const token = "TOKEN FROM INTERCEPTORS"
    if (token) {
      console.log("INSIDE request use")
      config.headers['Authorization'] = 'Bearer ' + token
    }

    return config
  },
  error => {
    Promise.reject(error)
  }
)


axios.interceptors.response.use(
  config => {
    console.log("inside interceptor response", config)
    return config
  },
  error => {
    Promise.reject(error)
  }
)


const root = ReactDOM.createRoot(document.getElementById('root'));
root.render(
  <React.StrictMode>
    <App />
  </React.StrictMode>
);

reportWebVitals();
App.js
import logo from './logo.svg';
import './App.css';
import { useEffect } from 'react';
import axios from 'axios';

function App() {

  useEffect(()=> {

    axios({
      method: 'get',
      url: 'http://localhost:1234/webservice.php'
    })
      .then(function (response) {
        console.log(response)
      });

  }, [])

  return (
    <>
    This is App component
    </>
  );
}

export default App;
webservice.php
<?php

header("Access-Control-Allow-Origin: *");

// echo "<pre>";
// print_r($_SERVER);

echo json_encode(["test" => "Hello world...."]);
Redux

npm install react-redux @reduxjs/toolkit
counterSlice.js
import { createSlice } from "@reduxjs/toolkit";

const initialState = {
  count: 0,
};

const counterSlice = createSlice({
  name: "counter",
  initialState,
  reducers: {
    increment: (state) => {
      state.count += 1;   // immer allows mutation
    },
    decrement: (state) => {
      state.count -= 1;
    },
  },
});

export const { increment, decrement } = counterSlice.actions;
export default counterSlice.reducer;
store.jsx
import { configureStore } from "@reduxjs/toolkit";
import counterReducer from "./counterSlice";

const store = configureStore({
  reducer: {
    counter: counterReducer,
  },
});

export default store;
main.jsx
import { StrictMode } from 'react'
import { createRoot } from 'react-dom/client'
import './index.css'
import App from './App.jsx'
import { Provider } from 'react-redux'
import store from './store.js'

createRoot(document.getElementById('root')).render(
  <StrictMode>
    <Provider store={store}> {/* Wrap your App inside Provider */}
    <App />
    </Provider>
  </StrictMode>,
)
App.jsx
import { useSelector, useDispatch } from "react-redux";
import { increment, decrement } from "./counterSlice";

function App() {
  const count = useSelector((state) => state.counter.count);
  const dispatch = useDispatch();

  return (
    <>
      <button onClick={() => dispatch(increment())}>+</button>
      <button onClick={() => dispatch(decrement())}>-</button>
      <h1>{count}</h1>
    </>
  );
}

export default App;
Routing
npm i react-router-dom npx create-react-app routingappApp.js
import Home from './components/Home';
import Blogs from './components/Blogs';
import Contact from './components/Contact';
import NoPage from './components/NoPage';
import { BrowserRouter, Outlet, Route, Routes } from 'react-router-dom';
import Layout from './components/Layout';

function App() {
  return (
    <>
    <h1>HELLO WORLD</h1>
    <BrowserRouter>
      <Routes>
        <Route path="/admin" element={<Layout />}>
          <Route index element={<Home />} />
          <Route path="contact" element={<Contact />} />
          <Route path="*" element={<NoPage />} />
        </Route>
        <Route path="/user" element={<Layout />}>
          <Route index element={<Home />} />
          <Route path="contact" element={<Contact />} />
          <Route path="blogs" element={<Blogs />} />
          <Route path="test" element={<div>This is test component</div>} />
          <Route path="*" element={<NoPage />} />
        </Route>
      </Routes>
    </BrowserRouter>
    </>

  );
}

export default App;
Layout.js
import { Outlet, Link } from "react-router-dom";

export default function Layout() {
  return (
    <>
      <nav>
        <ul>
          <li>
            <Link to="/">Home</Link>
          </li>
          <li>
            <Link to="/blogs">Blogs</Link>
          </li>
          <li>
            <Link to="/contact">Contact</Link>
          </li>
        </ul>
      </nav>
      <Outlet />
    </>
  )
}
Outlet is the block where router components get loaded
Datatable
listing.html
<!-- https://datatables.net/examples/server_side/simple.html -->
<!-- https://datatables.net/manual/ajax -->
<!-- https://datatables.net/manual/ajax#Column-data-points -->
<!-- https://stackoverflow.com/questions/64526856/how-to-add-edit-delete-buttons-in-each-row-of-datatable -->

<!DOCTYPE html>
<html lang="en">
<head>
    <meta charset="UTF-8">
    <meta http-equiv="X-UA-Compatible" content="IE=edge">
    <meta name="viewport" content="width=device-width, initial-scale=1.0">
    <link rel="stylesheet" type="text/css" href="https://cdn.datatables.net/1.12.1/css/jquery.dataTables.css">

    <link rel="stylesheet" type="text/css" href="https://cdnjs.cloudflare.com/ajax/libs/twitter-bootstrap/5.2.0/css/bootstrap.min.css">
    <link rel="stylesheet" type="text/css" href="https://cdn.datatables.net/1.12.1/css/dataTables.bootstrap5.min.css">

    <script type="text/javascript" charset="utf8" src="https://code.jquery.com/jquery-3.6.1.js"></script>
<script type="text/javascript" charset="utf8" src="https://cdn.datatables.net/1.12.1/js/jquery.dataTables.js"></script>
    <title>Document</title>
</head>
<body>
<table id="example" class="display table table-striped" style="width:100%">
        <thead>
            <tr>
                <th>Name</th>
                <th>Address</th>
                <th>Salary</th>
                <th>Action</th>
            </tr>
        </thead>
    </table>
</body>
<script>
    $(document).ready(function () {
    $('#example').DataTable({
        processing: true,
        serverSide: true,
        ajax: 'http://ciacloud.in/juhi/rems/get_employees.php',
        columns: [
            { data: 'name'},
            { data: 'address'},
            { data: 'salary'},
            {
                data: 'id',
                render: (data,type,row) => {
                    console.log({data,type,row})
                   return `<a href='edit_form.php?id=${data}'>Edit</a> | <a href='delete.php?id=${data}'>Delete</a>`;
                 }
            }
        ],
        columnDefs: [
            { orderable: false, targets: -1 },
            {
                "defaultContent": "-",
                "targets": "_all"
            }],
            order: [0,1,2,3],
    });
});
</script>
</html>
get_employees.php
<?php
$servername = "localhost";
$username = "username";
$password = "password";
$dbname = "database";
$params = $_REQUEST;
header('Access-Control-Allow-Origin: *');
$search = isset($params['search']['value']) && $params['search']['value'] != '' ? $params['search']['value'] : '';
try {
$conn = new PDO("mysql:host=$servername;dbname=$dbname", $username, $password);
$conn->setAttribute(PDO::ATTR_ERRMODE, PDO::ERRMODE_EXCEPTION);
$where = '';
if($search !== '')
$where = " name LIKE '$search%' ";
else
$where = " 1 = 1 ";
$sort_columns = ['name', 'address', 'salary'];
$sort_column_index = $params['order'][0]['column'];
$sort_order = isset($params['order'][0]['dir']) && $params['order'][0]['dir'] != 1 ? $params['order'][0]['dir'] : 'desc';
$order_by = " $sort_columns[$sort_column_index] $sort_order";
$offset = $params['start'];
$limit = $params['length'];
$sql = "SELECT * FROM employees WHERE $where ORDER BY $order_by LIMIT $offset, $limit";
$stmt = $conn->prepare($sql);
$stmt->execute();
// set the resulting array to associative
$result = $stmt->setFetchMode(PDO::FETCH_ASSOC);
$employees = $stmt->fetchAll();
} catch(PDOException $e) {
echo "Error: " . $e->getMessage();
}
$count_sql = "SELECT COUNT(*) FROM employees WHERE $where";
$result = $conn->prepare($count_sql);
$result->execute();
$totalRecords = $result->fetchColumn();
$conn = null;
$json_data = array(
"draw" => intval( $params['draw'] ),
"recordsTotal" => intval( $totalRecords ),
"recordsFiltered" => intval($totalRecords),
"data" => $employees,
"count_sql" => $count_sql,
"sql" => $sql,
);
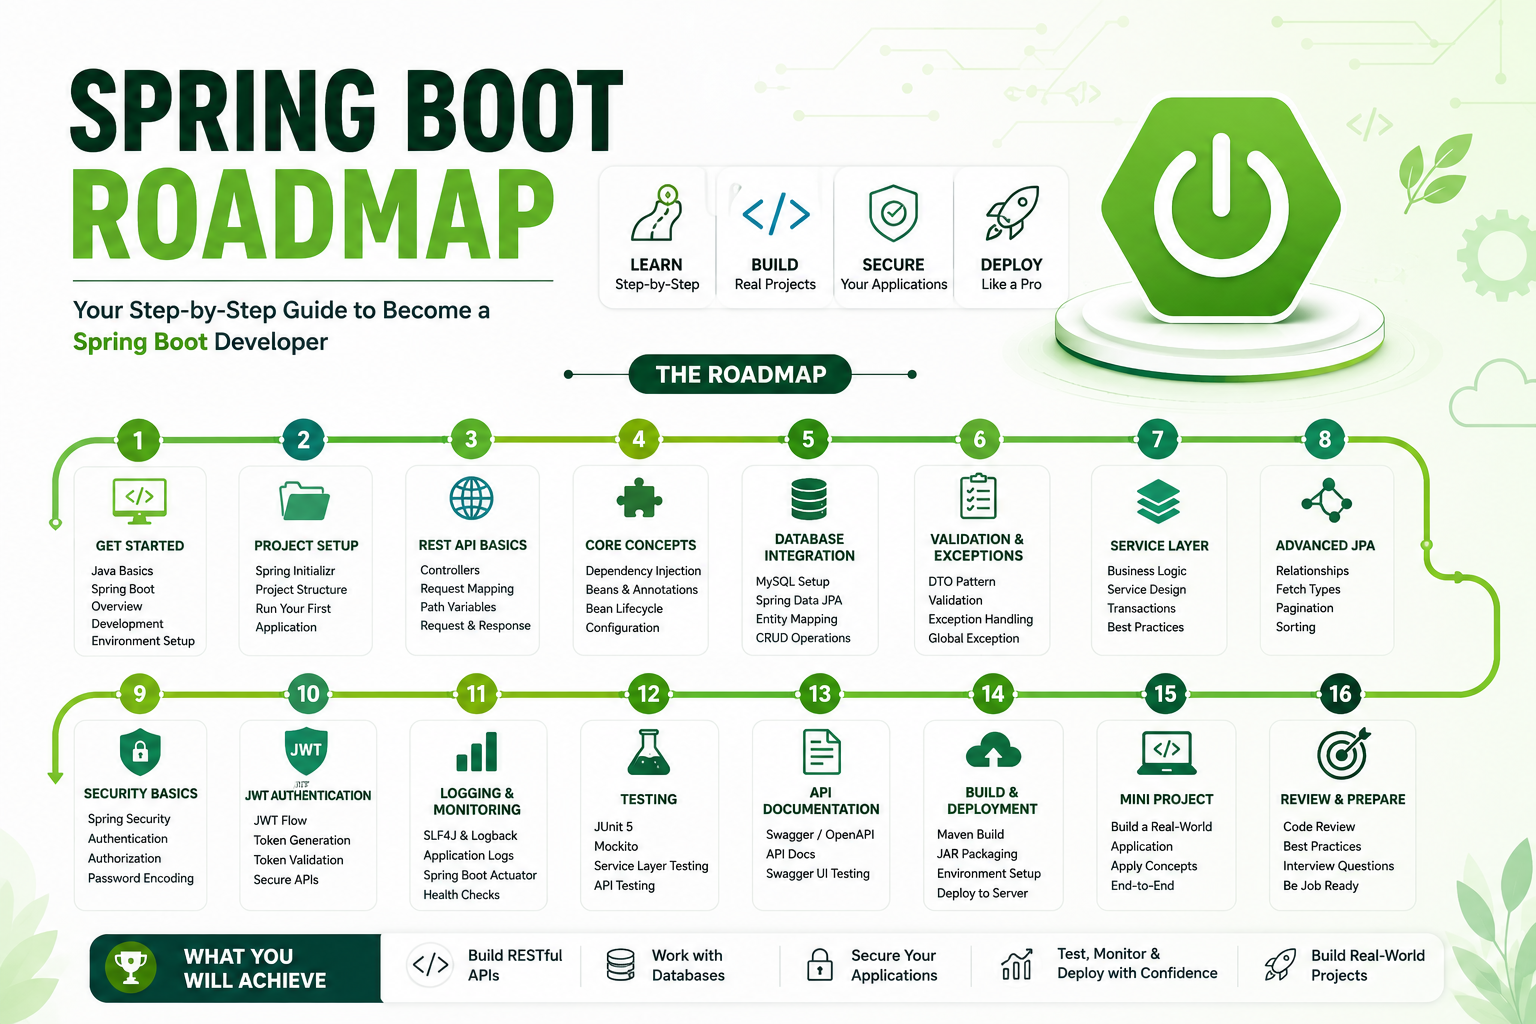
echo json_encode($json_data);Spring Boot
| Sr. No. | Topic | Details Covered |
|---|---|---|
| 1 | Introduction to Java & Spring Boot | Java Fundamentals RevisionJDK, JRE, JVMMaven BasicsSpring Framework OverviewSpring Boot Architecture |
| 2 | Spring Boot Project Setup | Spring InitializrProject Structureapplication.propertiesRunning First Spring Boot Application |
| 3 | REST API Development | ControllersRequest MappingPath VariablesQuery ParametersRequest BodyResponseEntity |
| 4 | Dependency Injection & Bean Management | @Component@Service@Repository@AutowiredConstructor InjectionBean Lifecycle |
| 5 | Database Integration | MySQL SetupSpring Data JPAEntity MappingRepository LayerCRUD Operations |
| 6 | DTO & Validation | DTO PatternRequest DTOResponse DTOModel MappingBean ValidationException Handling |
| 7 | Service Layer & Business Logic | Layered ArchitectureService DesignBusiness Logic ImplementationTransaction ManagementBest Practices |
| 8 | Advanced JPA Concepts | One-to-One MappingOne-to-Many MappingMany-to-One MappingFetch TypesPaginationSorting |
| 9 | Security Basics | Spring Security IntroductionAuthenticationAuthorizationPassword Encoding |
| 10 | JWT Authentication | JWT ArchitectureToken GenerationToken ValidationSecuring REST APIs |
| 11 | Logging & Monitoring | SLF4JLogbackApplication LoggingSpring Boot ActuatorHealth Checks |
| 12 | Testing | JUnit 5MockitoService Layer TestingController TestingAPI Testing |
| 13 | API Documentation | Swagger/OpenAPIAPI DocumentationSwagger UI Testing |
| 14 | Build & Deployment | Maven Build LifecycleJAR PackagingEnvironment ConfigurationLinux Deployment |
| 15 | Version Control | Git BasicsGit BranchingMerge & Pull RequestsGitHub Workflow |
| 16 | Mini Project Development | Project SetupDatabase DesignREST API DevelopmentSecurity ImplementationTesting |
| 17 | Project Review | Code ReviewPerformance ImprovementsBest Practices |
| 18 | Interview Preparation | Spring Boot Interview QuestionsJPA QuestionsREST API QuestionsMicroservices Overview |
| Sr. No. | Tool / Technology |
|---|---|
| 1 | Java 17+ |
| 2 | Spring Boot |
| 3 | Maven |
| 4 | MySQL |
| 5 | Spring Data JPA |
| 6 | Spring Security |
| 7 | JWT |
| 8 | Postman |
| 9 | Swagger/OpenAPI |
| 10 | Git & GitHub |
| 11 | VSCode, IntelliJ IDEA / Eclipse |
CalcController.java
package com.javatest.demo;

import org.springframework.web.bind.annotation.DeleteMapping;
import org.springframework.web.bind.annotation.GetMapping;
import org.springframework.web.bind.annotation.PostMapping;
import org.springframework.web.bind.annotation.PutMapping;
import org.springframework.web.bind.annotation.RequestBody;
import org.springframework.web.bind.annotation.RequestMapping;
import org.springframework.web.bind.annotation.RequestParam;
import org.springframework.web.bind.annotation.RestController;

class MyCalc {
    private int num1;
    private int num2;

    public int getNum1() {
        return num1;
    }
    public void setNum1(int num1) {
        this.num1 = num1;
    }
    public int getNum2() {
        return num2;
    }
    public void setNum2(int num2) {
        this.num2 = num2;
    }

    @Override
    public String toString() {
        return "MyCalc [num1=" + num1 + ", num2=" + num2 + "]";
    }
}

@RestController
public class CalcController {


    @RequestMapping("test")
    public String test() {
        return "Testing....";
    }

    /** Read query params */
    @RequestMapping("mycalc")
    @GetMapping
    public String getMet(@RequestParam("num1") int x, @RequestParam int y) {
        return String.format("%s + %s = %s", x, y, x+y);
    }

    /** Read raw json data */
    @PostMapping("mycalc")
    public String postMet(@RequestBody MyCalc obj) {
        int x = obj.getNum1();
        int y = obj.getNum2();

        return String.format("%s - %s = %s", x, y, x - y);
    }

    /** Read form data */
    @PutMapping("mycalc")
    public String putMet(
        @RequestParam("num1") int x,
        @RequestParam("num2") int y) {
        return String.format("%s * %s = %s", x, y, x * y);
    }

    /** Read from raw json */
    @DeleteMapping("mycalc")
    public String deleteMet(@RequestBody MyCalc obj) {
        int x = obj.getNum1();
        int y = obj.getNum2();
        return String.format("%s / %s = %s", x, y, x / y);
    }

}
src/main/resources/application.properties
spring.datasource.url=jdbc:mysql://localhost:3306/<databasename>
spring.datasource.username=<username>
spring.datasource.password=<password>
spring.datasource.driverClassName=com.mysql.cj.jdbc.Driver
User.java (POJO/DAO/JPA)
package com.javatest.demo;

import jakarta.persistence.Entity;
import jakarta.persistence.GeneratedValue;
import jakarta.persistence.GenerationType;
import jakarta.persistence.Id;
import jakarta.persistence.Table;

@Entity
@Table(name="users")
public class User {
    @Id
    @GeneratedValue(strategy = GenerationType.IDENTITY)
    private Long id;
    private String name;
    private String age;
    private String city;
    private int quota;

    public Long getId() {
        return id;
    }
    public void setId(Long id) {
        this.id = id;
    }
    public String getName() {
        return name;
    }
    public void setName(String name) {
        this.name = name;
    }
    public String getAge() {
        return age;
    }
    public void setAge(String age) {
        this.age = age;
    }
    public String getCity() {
        return city;
    }
    public void setCity(String city) {
        this.city = city;
    }
    public int getQuota() {
        return quota;
    }
    public void setQuota(int quota) {
        this.quota = quota;
    }


    // getters and setters


}
UserController.java
package com.javatest.demo;
import java.util.List;
import org.springframework.web.bind.annotation.DeleteMapping;
import org.springframework.web.bind.annotation.GetMapping;
import org.springframework.web.bind.annotation.PathVariable;
import org.springframework.web.bind.annotation.PostMapping;
import org.springframework.web.bind.annotation.PutMapping;
import org.springframework.web.bind.annotation.RequestBody;
import org.springframework.web.bind.annotation.RequestMapping;
import org.springframework.web.bind.annotation.RestController;
import org.springframework.data.jpa.repository.JpaRepository;
interface UserRepository extends JpaRepository<User, Long> {
// Custom queries can be defined here
}
@RestController
@RequestMapping("users")
public class UserController {
private final UserRepository userRepository;
public UserController(UserRepository userRepository) {
this.userRepository = userRepository;
}
@RequestMapping("")
public String index() {
return "I am from index";
}
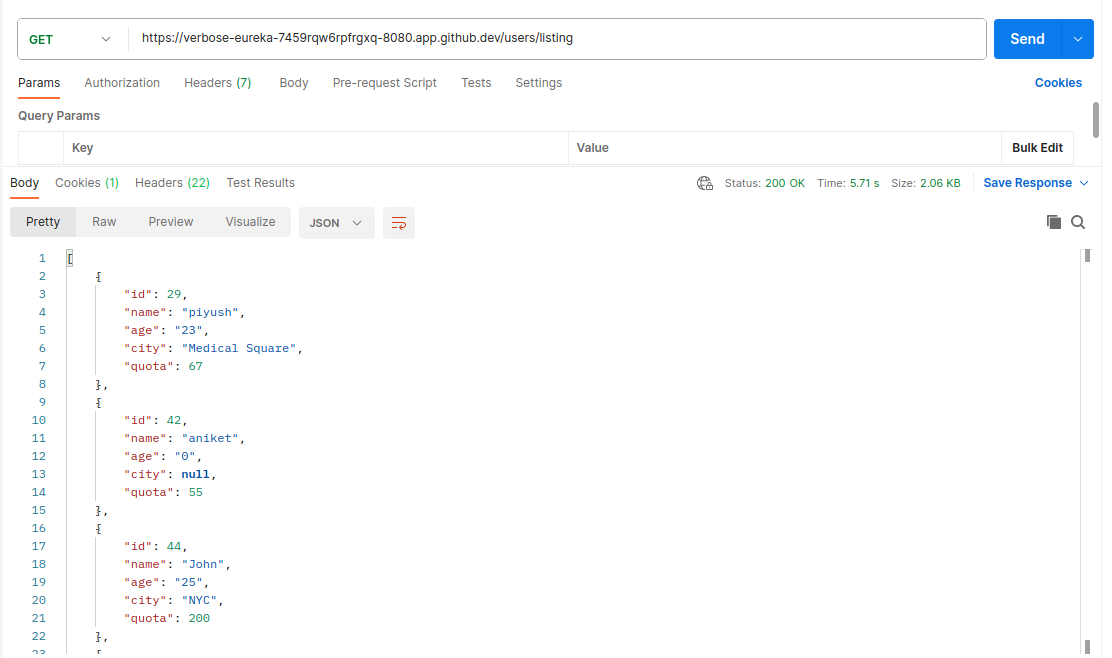
@RequestMapping("listing")
public List<User> listing() {
// List<User> users = new ArrayList<>();
return userRepository.findAll();
}
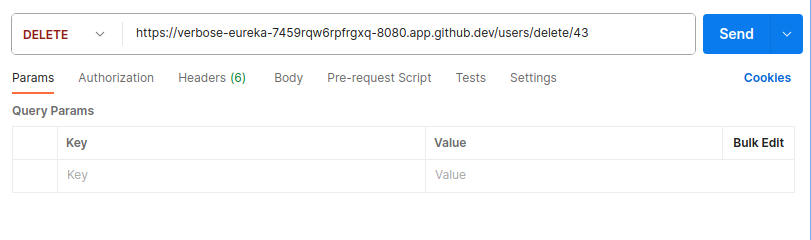
@DeleteMapping("delete/{id}")
public String deleteUser(@PathVariable Long id) {
// Check if the user with the specified ID exists
if (userRepository.existsById(id)) {
userRepository.deleteById(id);
return String.format("User %s is deleted successfully", id);
} else {
// Handle the case when the user does not exist (e.g., return an error response)
// You can throw an exception or return an appropriate response based on your application's requirements.
}
return "";
}
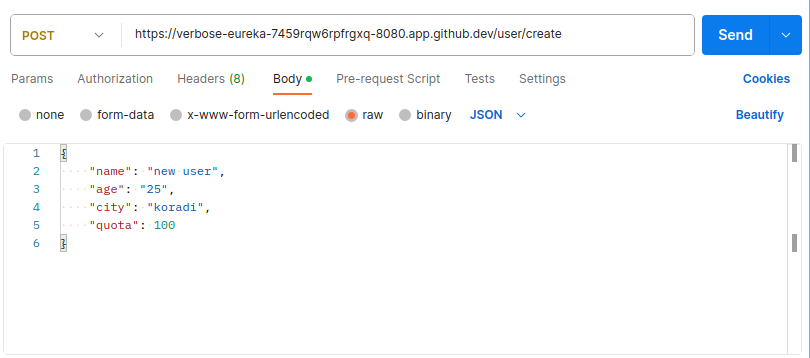
@PostMapping("create")
public User createUser(@RequestBody User user) {
return userRepository.save(user);
}
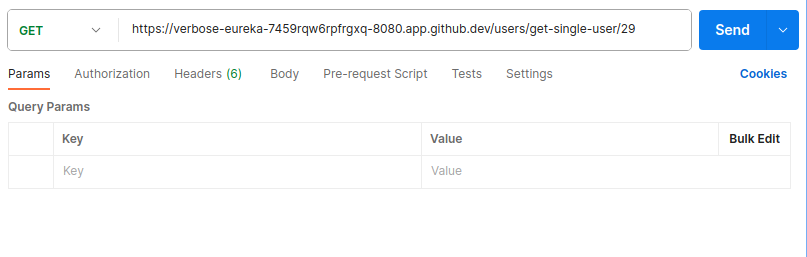
@GetMapping("get-single/{id}")
public User getUserById(@PathVariable Long id) {
// Use the UserRepository to fetch the user by ID
return userRepository.findById(id).orElse(null);
}
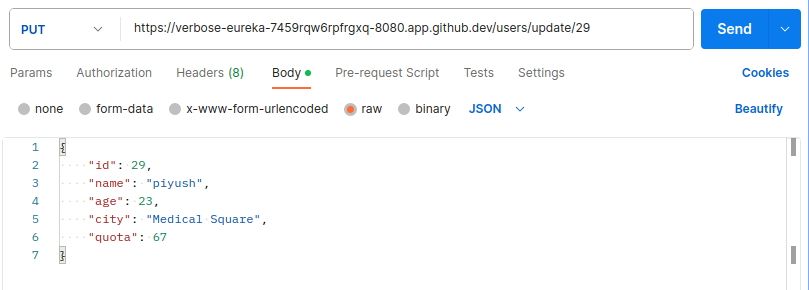
@PutMapping("/update/{id}")
public User updateUser(@PathVariable Long id, @RequestBody User updatedUser) {
// Check if the user with the specified ID exists
userRepository.findById(id).orElse(null);
// Set the ID of the updated user to the specified ID
updatedUser.setId(id);
// Save the updated user to the database
return userRepository.save(updatedUser);
}
}
DemoApplication.java (Run this file to serve spring boot application)
package com.javatest.demo;

import org.springframework.boot.SpringApplication;
import org.springframework.boot.autoconfigure.SpringBootApplication;

@SpringBootApplication
public class DemoApplication {

	public static void main(String[] args) {
		SpringApplication.run(DemoApplication.class, args);
	}

}
File Structure
.
├── HELP.md
├── mvnw
├── mvnw.cmd
├── pom.xml
├── src
│   ├── main
│   │   ├── java
│   │   │   └── com
│   │   │       └── javatest
│   │   │           └── demo
│   │   │               ├── CalcController.java
│   │   │               ├── DemoApplication.java
│   │   │               ├── User.java
│   │   │               └── UserController.java
│   │   └── resources
│   │       ├── application.properties
│   │       ├── static
│   │       └── templates
│   └── test
│       └── java
│           └── com
│               └── javatest
│                   └── demo
│                       └── DemoApplicationTests.java
└── target
    ├── classes
    │   ├── application.properties
    │   └── com
    │       └── javatest
    │           └── demo
    │               ├── CalcController.class
    │               ├── DemoApplication.class
    │               ├── MyCalc.class
    │               ├── User.class
    │               ├── UserController.class
    │               └── UserRepository.class
    └── test-classes
        └── com
            └── javatest
                └── demo
                    └── DemoApplicationTests.class

23 directories, 18 files
POC
VSCode Extesnsions
Spring Boot Web + JPA + MySQL
Got it ✅
Let’s build this from scratch, step by step, including MySQL dependency so you’re future-ready but you can still just run Hello World without DB config.
🚀 Spring Boot Hello World (with future MySQL support) in VS Code
1. Prerequisites
Check you have these installed:
java -version      # Java 17 or 21 recommended
mvn -v             # Maven installed
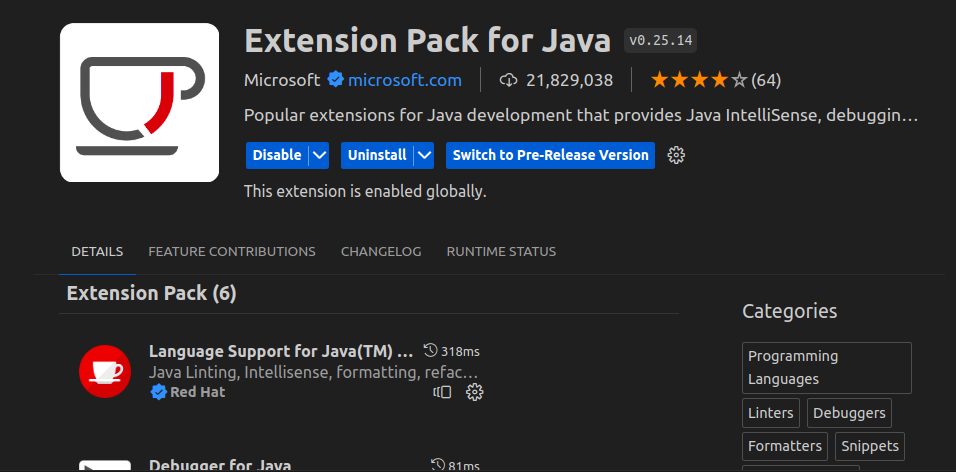
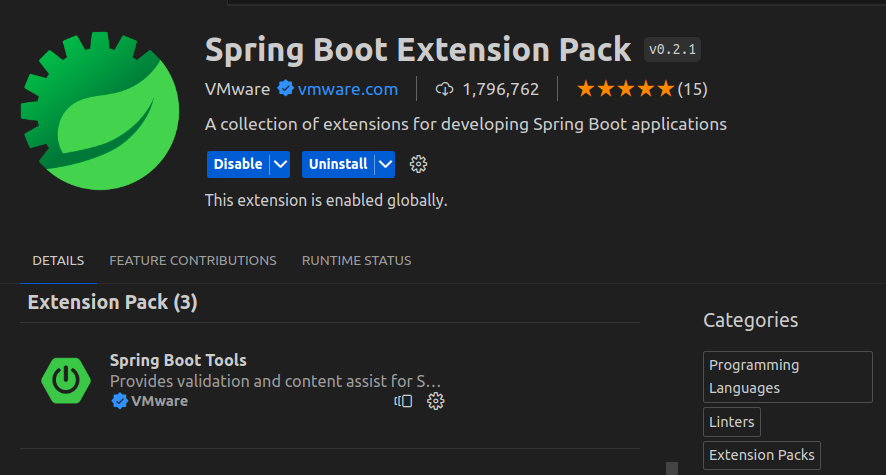
VS Code Extensions:
- Extension Pack for Java
- Spring Boot Extension Pack (optional but helpful)
2. Generate Spring Boot Project
Option A (VS Code)
- Press
Ctrl+Shift+P→ searchSpring Initializr: Create a Maven Project. - Select:
- Spring Boot version: 3.x (latest)
- Project: Maven
- Language: Java
- Group Id:
com.example - Artifact Id:
hello - Dependencies:
Spring Web,Spring Data JPA,MySQL Driver
- It will create and open the project in VS Code.
Option B (Browser)
Go to 👉 https://start.spring.io
Choose:
- Maven Project, Java, Spring Boot
3.x - Group:
com.example - Artifact:
hello - Dependencies:
Spring Web,Spring Data JPA,MySQL Driver
Download → unzip → open folder in VS Code.
src/main/resources/application.properties
spring.datasource.url=jdbc:mysql://localhost:3306/your_database
spring.datasource.username=root
spring.datasource.password=your_password

spring.jpa.hibernate.ddl-auto=update
spring.jpa.show-sql=true
spring.jpa.database-platform=org.hibernate.dialect.MySQLDialect
3. Project Structure
You’ll see:
hello/
 ├─ src/main/java/com/example/hello/
 │   ├─ HelloApplication.java
 │   └─ controller/HelloController.java   (we’ll create)
 ├─ src/main/resources/
 │   ├─ application.properties
 ├─ pom.xml
4. Minimal pom.xml
Your pom.xml should contain (important part only):
<dependencies>
    <!-- Spring Web for REST APIs -->
    <dependency>
        <groupId>org.springframework.boot</groupId>
        <artifactId>spring-boot-starter-web</artifactId>
    </dependency>

    <!-- MySQL JDBC Driver -->
    <dependency>
        <groupId>mysql</groupId>
        <artifactId>mysql-connector-j</artifactId>
        <scope>runtime</scope>
    </dependency>

    <!-- JPA (for DB support in future) -->
    <dependency>
        <groupId>org.springframework.boot</groupId>
        <artifactId>spring-boot-starter-data-jpa</artifactId>
    </dependency>

    <!-- Testing -->
    <dependency>
        <groupId>org.springframework.boot</groupId>
        <artifactId>spring-boot-starter-test</artifactId>
        <scope>test</scope>
    </dependency>
</dependencies>
⚡ Even if MySQL is not configured, the app will still run fine.
5. Application Entry Point
Generated file → HelloApplication.java:
package com.example.hello;

import org.springframework.boot.SpringApplication;
import org.springframework.boot.autoconfigure.SpringBootApplication;

@SpringBootApplication
public class HelloApplication {

    public static void main(String[] args) {
        SpringApplication.run(HelloApplication.class, args);
    }
}
6. Create Controller
Create folder controller under com.example.hello.
File: HelloController.java
package com.example.hello.controller;

import org.springframework.web.bind.annotation.GetMapping;
import org.springframework.web.bind.annotation.RestController;

@RestController
public class HelloController {

    @GetMapping("/hello")
    public String hello() {
        return "Hello World";
    }
}
7. Run the Application
In VS Code terminal:
mvn spring-boot:run
Or run HelloApplication.java directly via Run → Start Debugging.
8. Test in Browser / Curl
Visit:
http://localhost:8080/hello
Output:
Hello World
9. (Future) MySQL Connection Setup
When you’re ready to use MySQL, edit src/main/resources/application.properties:
spring.datasource.url=jdbc:mysql://localhost:3306/mydb
spring.datasource.username=root
spring.datasource.password=secret

spring.jpa.hibernate.ddl-auto=update
spring.jpa.show-sql=true
spring.jpa.properties.hibernate.dialect=org.hibernate.dialect.MySQL8Dialect
Then you can create Entity + Repository classes for DB operations.
10. Employee POJO / Repo / Controller
src/main/java/com/example/demo/Employee.java
package com.example.demo;

import jakarta.persistence.*;

@Entity
@Table(name = "employee")
public class Employee {

    @Id
    @GeneratedValue(strategy = GenerationType.IDENTITY)
    private Long id;

    private String name;
    private String department;
    private Double salary;

    // getters & setters
    public Long getId() { return id; }
    public void setId(Long id) { this.id = id; }

    public String getName() { return name; }
    public void setName(String name) { this.name = name; }

    public String getDepartment() { return department; }
    public void setDepartment(String department) { this.department = department; }

    public Double getSalary() { return salary; }
    public void setSalary(Double salary) { this.salary = salary; }

}
src/main/java/com/example/demo/EmployeeRepository.java
package com.example.demo;

import org.springframework.data.jpa.repository.JpaRepository;

public interface EmployeeRepository extends JpaRepository<Employee, Long> {
}
src/main/java/com/example/demo/EmployeeController.java
package com.example.demo;

import org.springframework.web.bind.annotation.*;

import java.util.List;

@CrossOrigin(origins = "*")
@RestController
@RequestMapping("/employees")
public class EmployeeController {

    private final EmployeeRepository employeeRepository;

    public EmployeeController(EmployeeRepository employeeRepository) {
        this.employeeRepository = employeeRepository;
    }

    // ✅ CREATE (POST)
    @PostMapping
    public Employee createEmployee(@RequestBody Employee employee) {
        return employeeRepository.save(employee);
    }

    // ✅ READ ALL (GET)
    @GetMapping
    public List<Employee> getAllEmployees() {
        return employeeRepository.findAll();
    }

    // ✅ READ BY ID (GET)
    @GetMapping("/{id}")
    public Employee getEmployeeById(@PathVariable Long id) {
        return employeeRepository.findById(id).orElse(null);
    }

    // ✅ UPDATE (PUT)
    @PutMapping("/{id}")
    public Employee updateEmployee(
            @PathVariable Long id,
            @RequestBody Employee updatedEmployee) {

        Employee existing = employeeRepository.findById(id).orElse(null);

        if (existing == null) {
            return null;
        }

        existing.setName(updatedEmployee.getName());
        existing.setDepartment(updatedEmployee.getDepartment());
        existing.setSalary(updatedEmployee.getSalary());

        return employeeRepository.save(existing);
    }

    // ✅ DELETE (DELETE)
    @DeleteMapping("/{id}")
    public String deleteEmployee(@PathVariable Long id) {

        if (!employeeRepository.existsById(id)) {
            return "Employee not found";
        }

        employeeRepository.deleteById(id);
        return "Employee deleted successfully";
    }
}
frontend/index.html
<!DOCTYPE html>
<html>
<head>
    <title>Employee CRUD</title>
    <style>
        table {
            border-collapse: collapse;
            width: 70%;
            margin-top: 20px;
        }
        th, td {
            border: 1px solid #333;
            padding: 8px;
        }
        th {
            background-color: #f2f2f2;
        }
        button {
            margin-right: 5px;
        }
        input {
            margin: 5px;
        }
    </style>
</head>
<body>

<h2>Employee Management</h2>

<!-- ADD / EDIT FORM -->
<input type="hidden" id="empId">

<input type="text" id="name" placeholder="Name">
<input type="text" id="department" placeholder="Department">
<input type="number" id="salary" placeholder="Salary">

<button onclick="saveEmployee()">Add / Update</button>

<!-- TABLE -->
<table>
    <thead>
        <tr>
            <th>ID</th>
            <th>Name</th>
            <th>Department</th>
            <th>Salary</th>
            <th>Action</th>
        </tr>
    </thead>
    <tbody id="employeeTable"></tbody>
</table>

<script>
    const apiUrl = "http://localhost:8080/employees";

    function loadEmployees() {
        fetch(apiUrl)
            .then(res => res.json())
            .then(data => {
                const table = document.getElementById("employeeTable");
                table.innerHTML = "";

                data.forEach(emp => {
                    table.innerHTML += `
                        <tr>
                            <td>${emp.id}</td>
                            <td>${emp.name}</td>
                            <td>${emp.department}</td>
                            <td>${emp.salary}</td>
                            <td>
                                <button onclick="editEmployee(${emp.id}, '${emp.name}', '${emp.department}', ${emp.salary})">Edit</button>
                                <button onclick="deleteEmployee(${emp.id})">Delete</button>
                            </td>
                        </tr>
                    `;
                });
            });
    }

    function saveEmployee() {
        const id = document.getElementById("empId").value;
        const employee = {
            name: document.getElementById("name").value,
            department: document.getElementById("department").value,
            salary: document.getElementById("salary").value
        };

        if (id) {
            // UPDATE
            fetch(`${apiUrl}/${id}`, {
                method: "PUT",
                headers: { "Content-Type": "application/json" },
                body: JSON.stringify(employee)
            }).then(() => resetForm());
        } else {
            // CREATE
            fetch(apiUrl, {
                method: "POST",
                headers: { "Content-Type": "application/json" },
                body: JSON.stringify(employee)
            }).then(() => resetForm());
        }
    }

    function editEmployee(id, name, department, salary) {
        document.getElementById("empId").value = id;
        document.getElementById("name").value = name;
        document.getElementById("department").value = department;
        document.getElementById("salary").value = salary;
    }

    function deleteEmployee(id) {
        if (confirm("Are you sure?")) {
            fetch(`${apiUrl}/${id}`, { method: "DELETE" })
                .then(() => loadEmployees());
        }
    }

    function resetForm() {
        document.getElementById("empId").value = "";
        document.getElementById("name").value = "";
        document.getElementById("department").value = "";
        document.getElementById("salary").value = "";
        loadEmployees();
    }

    // Load on page load
    loadEmployees();
</script>

</body>
</html>
✅ That’s it — you now have:
- A working Hello World REST API (
/hello) - MySQL support already included for future use
SQL DQL Test 2
- list all selling in 2019
- count all selling year wise order by selling
- select all selling in march month of year 2019
- count selling in 22 week of year 2020
- select all selling from 1st Feb 2019 to 31st Mar 2019
- select all customers who place orders in 2019
- select all customers from USA who placed order in 2019
- select all customers whose order is on hold
- select all customers who placed order in march month only
- select top 5 customers from USA (who has maximum orders from country USA)
SQL DQL Test 1
- select employees in descending order – salary
- select all employees from Mumbai
- select all employees having salary more than average salary
- select sum of salary from table
- select all unique address
- select details, salary from table
(details should be concatenation of name and address)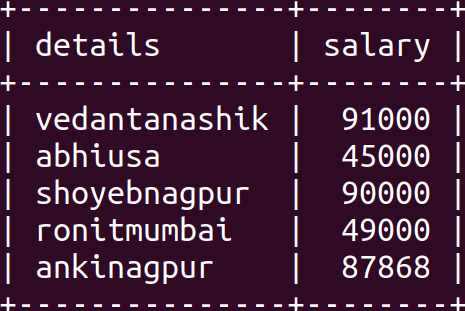
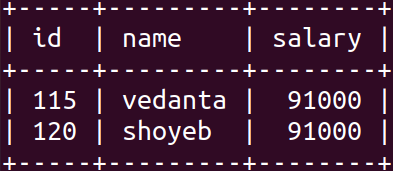
- select names of employees having max salary
- select employees having 2nd max salary
- count employees by address, order by employee count
e.g. select count(name,address) from employee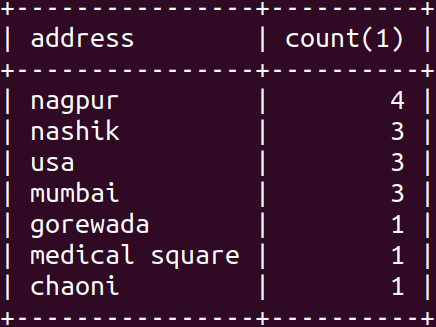
- show count of employees from nagpur only
- select all employees whose names starts or ends with vowels
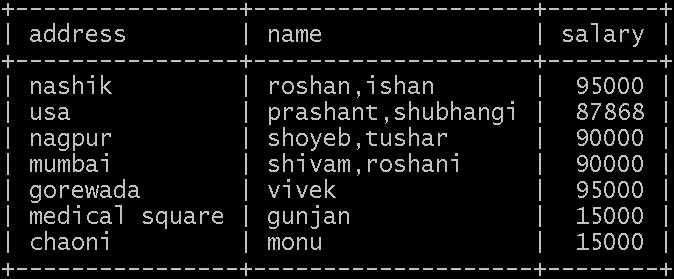
- find employees having max salary in particular city
- select top 5 salaried employees
- select 2nd highest salaried employees
- show cities having total salary more than 200000
- Show all students who appeared for exam
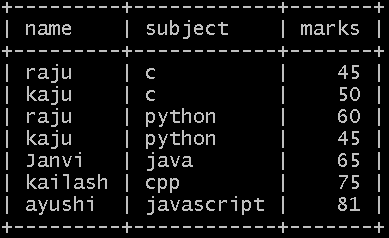
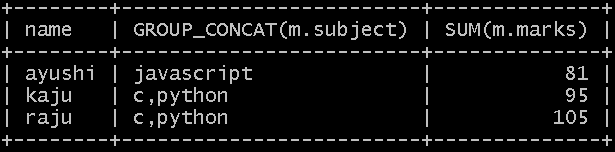
- show student, subject and total marks of students whose total marks are more than 80
Python
Online Tool
Software to be installed for Python
Python
https://www.python.org/downloads/
XAMPP
https://www.apachefriends.org/download.html
Git for Windows
https://gitforwindows.org/
Nodepad++
https://notepad-plus-plus.org/downloads/
Heroku cli
https://devcenter.heroku.com/articles/heroku-cli#download-and-install
PHP CRUD CHEAT SHEET
MySQL Schema
CREATE TABLE `users` (
  `id` int NOT NULL AUTO_INCREMENT,
  `name` varchar(50) NOT NULL,
  `age` int NOT NULL,
  `city` varchar(50) NOT NULL,
  PRIMARY KEY (`id`)
) ENGINE=InnoDB;
REST API
rest_api.php
<?php

header('Access-Control-Allow-Origin: *');

$servername = "localhost";
$username = "diituser";
$password = "%TGBbgt5";
$dbname = "ecom";

try {
  $conn = new PDO("mysql:host=$servername;dbname=$dbname", $username, $password);
  $conn->setAttribute(PDO::ATTR_ERRMODE, PDO::ERRMODE_EXCEPTION);

} catch(PDOException $e) {
  echo "Error: " . $e->getMessage();
}


switch($_SERVER['REQUEST_METHOD']) {
    case 'GET':

        if(isset($_REQUEST['id']) && $_REQUEST['id'] != '') {
            $id = $_REQUEST['id'];
            $sql = "SELECT * FROM users WHERE id = $id";
            $stmt = $conn->prepare($sql);
            $stmt->execute();
            $result = $stmt->setFetchMode(PDO::FETCH_ASSOC);
            $records = $stmt->fetch();
        } else {
            $sql = "SELECT * FROM users";
            $stmt = $conn->prepare($sql);
            $stmt->execute();
            $result = $stmt->setFetchMode(PDO::FETCH_ASSOC);
            $records = $stmt->fetchAll();
        }
        echo json_encode($records);

    case 'DELETE':

        $data = json_decode(file_get_contents('php://input'), true);

        $id = $data["id"];
        $sql = "DELETE FROM users WHERE id = $id";
        $stmt = $conn->prepare($sql);
        $stmt->execute();
        echo json_encode(["result" => "success"]);

    case 'POST':

        $data = json_decode(file_get_contents('php://input'), true);

        $name = $data["name"];
        $age = $data['age'];
        $city = $data['city'];
        $sql = "INSERT INTO `users` (`id`, `name`, `age`, `city`) VALUES (NULL, '$name', '$age', '$city'); ";
        $stmt = $conn->prepare($sql);
        $stmt->execute();
        echo json_encode(["result" => "success"]);

    case 'PUT':

        $data = json_decode(file_get_contents('php://input'), true);

        $id = $data['id'];
        $name = $data["name"];
        $age = $data['age'];
        $city = $data['city'];
        $sql = "UPDATE users SET `name` = '$name', age = '$age', city = '$city' WHERE id = $id";
        $stmt = $conn->prepare($sql);
        $stmt->execute();
        echo json_encode(["result" => "success"]);
}


$conn = null;
FRONT END
script.js
const api_url = "rest_api.php";
function loadData(records = []) {
var table_data = "";
for (let i = 0; i < records.length; i++) {
table_data += `<tr>`;
table_data += `<td>${records[i].name}</td>`;
table_data += `<td>${records[i].age}</td>`;
table_data += `<td>${records[i].city}</td>`;
table_data += `<td>`;
table_data += `<a href="edit.php?id=${records[i].id}"><button class="btn btn-primary">Edit</button></a>`;
table_data += " ";
table_data += `<button class="btn btn-danger" onclick=deleteData('${records[i].id}')>Delete</button>`;
table_data += `</td>`;
table_data += `</tr>`;
}
//console.log(table_data);
document.getElementById("tbody").innerHTML = table_data;
}
function getData() {
fetch(api_url)
.then((response) => response.json())
.then((data) => {
console.table(data);
loadData(data);
});
}
function getDataById(id) {
fetch(`${api_url}?id=${id}`)
.then((response) => response.json())
.then((data) => {
console.log(data);
document.getElementById("id").value = data.id;
document.getElementById("name").value = data.name;
document.getElementById("age").value = data.age;
document.getElementById("city").value = data.city;
});
}
function postData() {
var name = document.getElementById("name").value;
var age = document.getElementById("age").value;
var city = document.getElementById("city").value;
data = { name: name, age: age, city: city };
fetch(api_url, {
method: "POST",
headers: {
Accept: "application/json",
"Content-Type": "application/json",
},
body: JSON.stringify(data),
})
.then((response) => response.json())
.then((data) => {
console.log(data);
window.location.href = "index.php";
});
}
function putData() {
var id = document.getElementById("id").value;
var name = document.getElementById("name").value;
var age = document.getElementById("age").value;
var city = document.getElementById("city").value;
data = { id: id, name: name, age: age, city: city };
fetch(api_url, {
method: "PUT",
headers: {
Accept: "application/json",
"Content-Type": "application/json",
},
body: JSON.stringify(data),
})
.then((response) => response.json())
.then((data) => {
console.table(data);
window.location.href = "index.php";
});
}
function deleteData(id) {
user_input = confirm("Are you sure you want to delete this record?");
if (user_input) {
fetch(api_url, {
method: "DELETE",
headers: {
Accept: "application/json",
"Content-Type": "application/json",
},
body: JSON.stringify({ id: id }),
})
.then((response) => response.json())
.then((data) => {
console.log(data);
window.location.reload();
});
}
}
index.php
<html>
<head>
<title>Project</title>
<link href="https://cdn.jsdelivr.net/npm/bootstrap@5.0.2/dist/css/bootstrap.min.css" rel="stylesheet" crossorigin="anonymous">
<script src="https://cdn.jsdelivr.net/npm/bootstrap@5.0.2/dist/js/bootstrap.bundle.min.js" crossorigin="anonymous"></script>
</head>
<body class="d-flex flex-column h-100 container">
<header>
<nav class="navbar navbar-expand-lg navbar-light bg-light">
<div class="container-fluid">
<div class="collapse navbar-collapse" id="navbarNavAltMarkup">
<div class="navbar-nav">
<a class="nav-link active" aria-current="page" href="#">Listing</a>
<a class="nav-link" href="add.php">Add New</a>
</div>
</div>
</div>
</nav>
</header>
<table class="table table-striped table-hover text-center">
<thead>
<th>Name</th>
<th>Age</th>
<th>City</th>
<th>Action</th>
</thead>
<tbody id="tbody">
</tbody>
<tfoot>
</tfoot>
</table>
<footer class="footer mt-auto py-3 bg-light">
<div class="container text-center">
<span class="text-muted">right © 2021</span>
</div>
</footer>
</body>
<script src="script.js"></script>
<script>
getData();
</script>
</html>add.php
<html>
<head>
<title>Project</title>
<link href="https://cdn.jsdelivr.net/npm/bootstrap@5.0.2/dist/css/bootstrap.min.css" rel="stylesheet" crossorigin="anonymous">
<script src="https://cdn.jsdelivr.net/npm/bootstrap@5.0.2/dist/js/bootstrap.bundle.min.js" crossorigin="anonymous"></script>
</head>
<body class="d-flex flex-column h-100 container">
<header>
<nav class="navbar navbar-expand-lg navbar-light bg-light">
<div class="container-fluid">
<div class="collapse navbar-collapse" id="navbarNavAltMarkup">
<div class="navbar-nav">
<a class="nav-link" href="index.php">Listing</a>
<a class="nav-link active" aria-current="page" href="add.php">Add New</a>
</div>
</div>
</div>
</nav>
</header>
<h3>Add Document</h3>
<form onsubmit="return false;">
<div class="mb-3">
<label for="name" class="form-label">Name</label>
<input type="text" class="form-control" id="name" autofocus>
</div>
<div class="mb-3">
<label for="exampleInputPassword1" class="form-label">Age</label>
<input type="text" class="form-control" id="age">
</div>
<div class="mb-3">
<label for="city" class="form-label">City</label>
<input type="text" class="form-control" id="city">
</div>
<button class="btn btn-primary" onclick="return postData()">Submit</button>
<a href="index.php" class="btn btn-primary">Cancel</a>
</form>
<footer class="footer mt-auto py-3 bg-light">
<div class="container text-center">
<span class="text-muted">right © 2021</span>
</div>
</footer>
</body>
<script src="script.js"></script>
<script>
</script>
</html>edit.php
<html>
<head>
<title>Project</title>
<link href="https://cdn.jsdelivr.net/npm/bootstrap@5.0.2/dist/css/bootstrap.min.css" rel="stylesheet" crossorigin="anonymous">
<script src="https://cdn.jsdelivr.net/npm/bootstrap@5.0.2/dist/js/bootstrap.bundle.min.js" crossorigin="anonymous"></script>
</head>
<body class="d-flex flex-column h-100 container">
<header>
<nav class="navbar navbar-expand-lg navbar-light bg-light">
<div class="container-fluid">
<div class="collapse navbar-collapse" id="navbarNavAltMarkup">
<div class="navbar-nav">
<a class="nav-link" href="index.php">Listing</a>
<a class="nav-link active" aria-current="page" href="add.php">Add New</a>
</div>
</div>
</div>
</nav>
</header>
<h3>Edit Document</h3>
<form onsubmit="return false;">
<input type="hidden" class="form-control" id="id">
<div class="mb-3">
<label for="name" class="form-label">Name</label>
<input type="text" class="form-control" id="name" autofocus>
</div>
<div class="mb-3">
<label for="exampleInputPassword1" class="form-label">Age</label>
<input type="text" class="form-control" id="age">
</div>
<div class="mb-3">
<label for="city" class="form-label">City</label>
<input type="text" class="form-control" id="city">
</div>
<button class="btn btn-primary" onclick="return putData()">Update</button>
<a href="index.php" class="btn btn-primary">Cancel</a>
</form>
<footer class="footer mt-auto py-3 bg-light">
<div class="container text-center">
<span class="text-muted">right © 2021</span>
</div>
</footer>
</body>
<script src="script.js"></script>
<script>
const urlParams = new URLSearchParams(window.location.search);
const id = urlParams.get('id');
getDataById(id);
</script>
</html>