React is a free and open-source front-end JavaScript library for building user interfaces based on UI components. It is maintained by Meta and a community of individual developers and companies. React can be used as a base in the development of single-page or mobile applications.
Create new react project
npm -v
npm i npx
npx create-react-app my-react-app
cd my-react-app
code .
Run from terminal
npm start

OR

npm start --port 8000
Open Browser and run the react app http://localhost:3000 OR http://ipaddress:3000
App.js
import logo from './logo.svg';
import './App.css';

function App() {
  return (
    <>
      <h1>Test App</h1>
    </>
  );
}

export default App;
Create new component and use click and change event
src/components/Add.js
import { Fragment, useState } from "react";


function Add () {

    const [ num1, setNum1 ] = useState(0);
    const [ num2, setNum2 ] = useState(0);
    const [ result, setResult ] = useState(0);

    function addFun() {
        setResult(num1 + num2);
    }

    return (<Fragment>
        <h1>Addition of two numbers</h1>
        <input type="text" onChange={ e => setNum1(parseInt(e.target.value)) }/>
        <input type="text" onChange={ e => setNum2(parseInt(e.target.value)) } />
        <button onClick={addFun}>Get Addtion</button>
        <div>{result}</div>
    </Fragment>);
}

export default Add;
Add this Add component in App component as tag <Add />
* => any number of occurrence
? => 0 or 1 occurrence
+ => 1 or many occurrence

e.g. adarsh mishra
to match 1 space /adarsh\smishra/
to match multiple space /adarsh\s+mishra/
to match 0 or many spaces /adarsh\s*mishra/
no special characters
^[0-9a-zA-Z\s]+$
limited characters or numbers
^[0-9]{6}$
^[a-z]{3}$
min / max range characters or numbers
^[0-9]{3,6}$
^[a-z]{3,6}$
OR clause
^(chacha|bhatija)$
case insensitive
//i
global check
//g
search any pattern (.) e.g. “https://www.youtube.com/watch?v=hw_HpTI_Wkw”.match(/v=(.)/)[1]
git add .
git commit -m 'msg'

#to verify origin
git config -l

#if you are not able to see url and fetch then run git remote add origin
#remote.heroku.url=https://git.heroku.com/project.git
#remote.heroku.fetch=+refs/heads/*:refs/remotes/heroku/*
#git remote add origin heroku_git_url
#git push origin master

git push heroku master
Once app is deployed it will show you an url which you can access publicly from internet.
http {

	server {

		listen 8081;
		root /var/www/html/websites;

		#with root no need to specify in url as location automatically append to root
		location /sqr {
			root /var/www/html/websites;
		}

		#with alias need to specify in url as location does not append to alias
		location /test {
			alias /var/www/html/websites/vegetables/;
			try_files $uri veggies.html =404;
		}

		#with regex add try_files directive
		location ~* /foo$ {
			alias /var/www/html/websites/fruits/site;
			try_files $uri $uri/index.html =404;
		}

		#with regex add try_files directive above will serve only till foo but below code will serve after foo also e.g. http://site.com/foo/abc.html
		location ~* /foo {
			alias /var/www/html/websites/fruits/site;
			try_files $uri $uri/index.html =404;
		}

	}

}

events {}
nginx -s reload
Check using following url
http://yoursite/sqr
http://yoursite/test
http://yoursite/foo/
Redirect and Rewrite
#this will redirect to foo and also changes the URL
location /bar {
	return 307 /foo;
}
#this will rewrite the url i.e. URL would not change URL will be fizz and content will load from foo
rewrite /fizz /foo;
Nginx as a Load Balancer
# Define an upstream block to group backend servers
upstream backend_servers {
    # List of backend servers
    server backend1.example.com:8080;
    server backend2.example.com:8080;
    server backend3.example.com:8080;
    server backend4.example.com:8080;
}


server {
    listen 80;  # Listen on port 80

    # Define the server name (domain or IP)
    server_name www.example.com;

    # Location block to define how requests should be handled
    location / {
        # Use the defined upstream group for proxying requests
        proxy_pass http://backend_servers;
}
Run from terminal
while true; do curl -s http://www.example.com; sleep 1; done;
Example
you can run 2 servers locally using php -S or using docker containers by mapping 2 ports
http {

	upstream backend_servers {
		server localhost:1234;
		server localhost:4567;
	}


	server {

		listen 8081;
		#root /var/www/html/websites;


		location / {
			proxy_pass http://backend_servers;
		}


	}

}

events {}
PHP FPM socket configuration
user www-data;

events {}

http {

    root /var/www/samosa;


    server {

        access_log /var/log/nginx/samosa-access.log;
        error_log /var/log/nginx/samosa-error.log;

        error_page 404 /404.html;

        location ~ \.php$ {
            include snippets/fastcgi-php.conf;
            fastcgi_pass unix:/run/php/php8.1-fpm.sock;
        }
    }
}
create project and verify with normal url
mkdir /var/www/html/myproject
vim index.html
<h1>Hello World</h1>
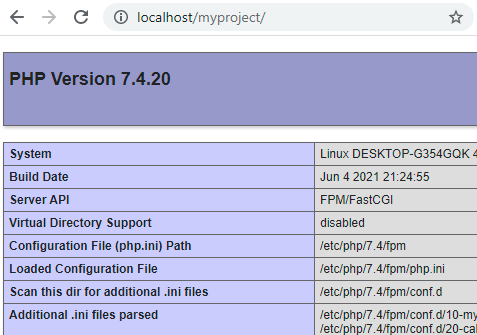
vim index.php
<?php

phpinfo();
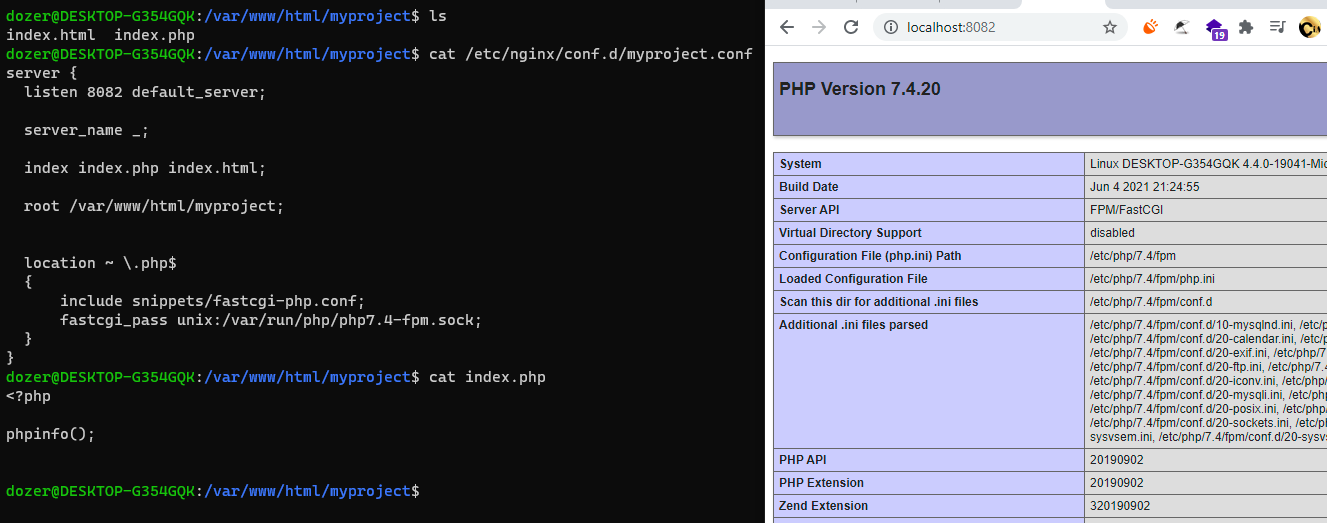
Create server block conf file
vim /etc/nginx/conf.d/myproject.conf
server {
  listen 8082 default_server;
  server_name _;

  index index.php index.html;

  root /var/www/html/myproject;

  location ~ \.php$
  {
      include snippets/fastcgi-php.conf;
      fastcgi_pass unix:/var/run/php/php7.4-fpm.sock;
  }
}
Test nginx configuration
nginx -t
restart nginx
sudo service nginx restart
OR
sudo systemctl restart nginx
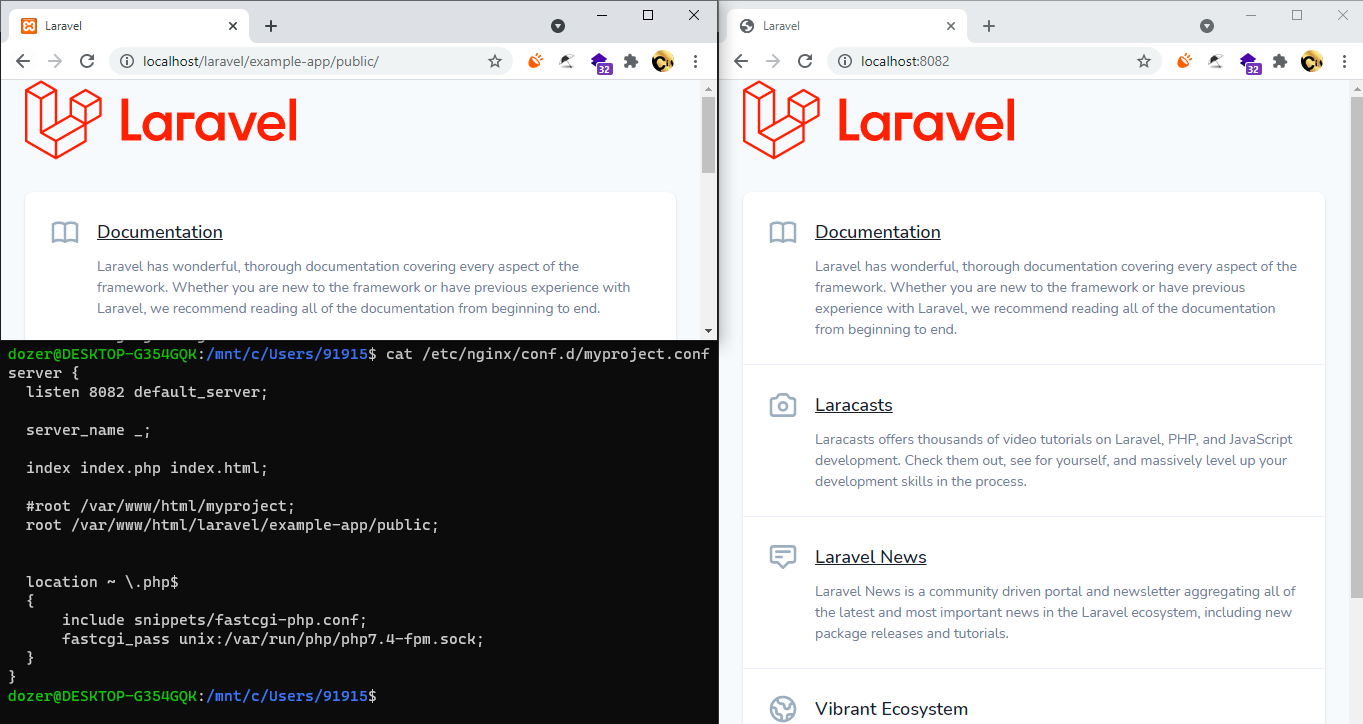
For Laravel Project Specify path till public directory
Need to explore
worker process
log format
weight in upstream
upstream block ip:port down
nginx plus
directives – listen root index access_log error_log